Showing posts with label acrylic paint. Show all posts

Friday, November 4, 2016

Autumn Art Workshop with Vera Dickenson

Last month, I attended a 3 day workshop with Vera Dickenson, through the Autumn Art Workshops.  This was in a rustic setting at a 4H camp in Halsey, NE.  There was a bit of "roughing it" at the camp, it has dormitory style cabins with shared bathrooms. But there was electricity and indoor plumbing so it really was not too bad.
 

The camp only had Wifi in the main building, and it was spotty and slow. It was a great thing to "unplug", as it really made me concentrate on my art making. After dinner, without the internet or TV, there wasn't much to do other than work on art, read, or socialize.

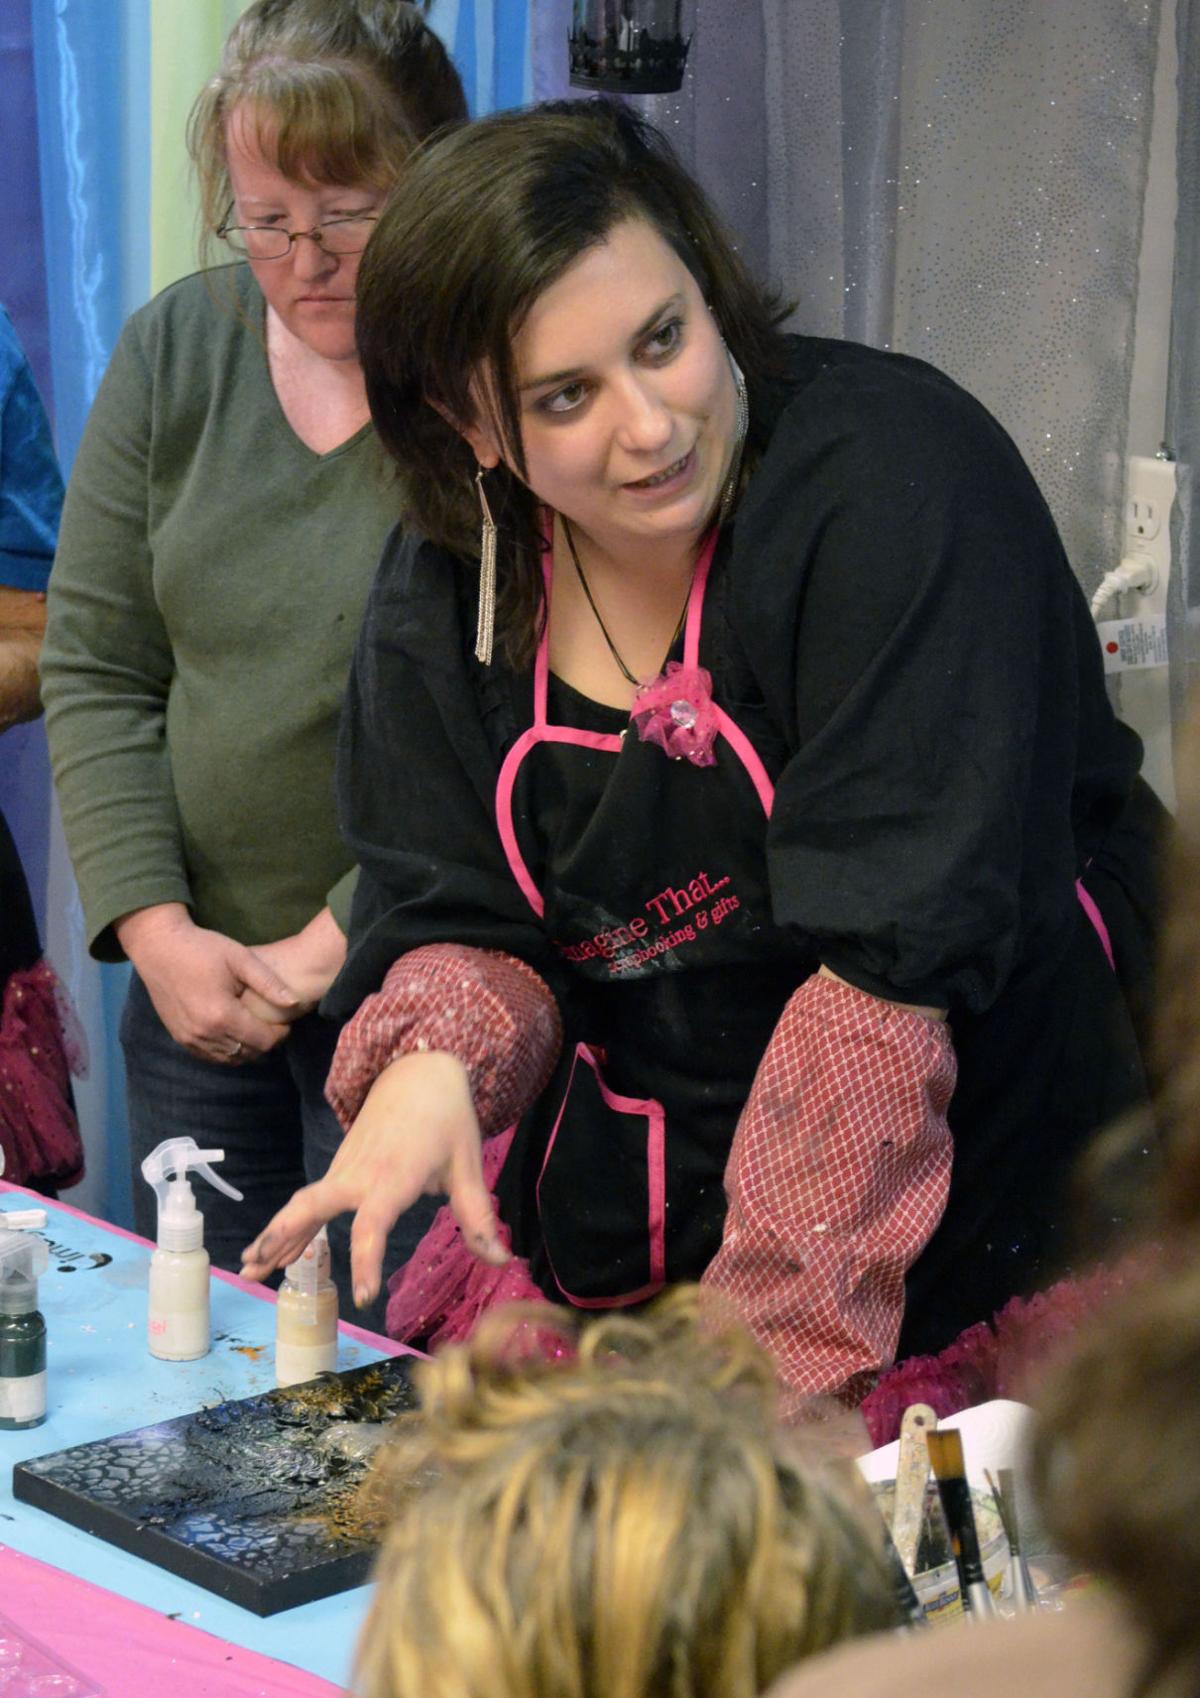
My workshop was with Vera Dickenson, but there were two other workshops available as well. Vera's workshop was listed as mixed media, but it was mainly acrylic painting. We used Yupo paper for some of our projects, which I had never used before.


For one project, we used gel medium and stencils to create a textured surface.  I loved this, and loved how my project turned out.

Closeup:

On another project, we used black gesso, acrylic ink, and transparent glazes. I really struggled with this piece. I should not have used a person (actually a mannequin) as my photo reference as I haven't drawn people lately and it looks very stiff. Also, my glazes weren't transparent enough, so I lost some of the soft feeling that this technique can provide.
I actually liked my sketch better. It accidentally got wet, which actually made it more interesting.


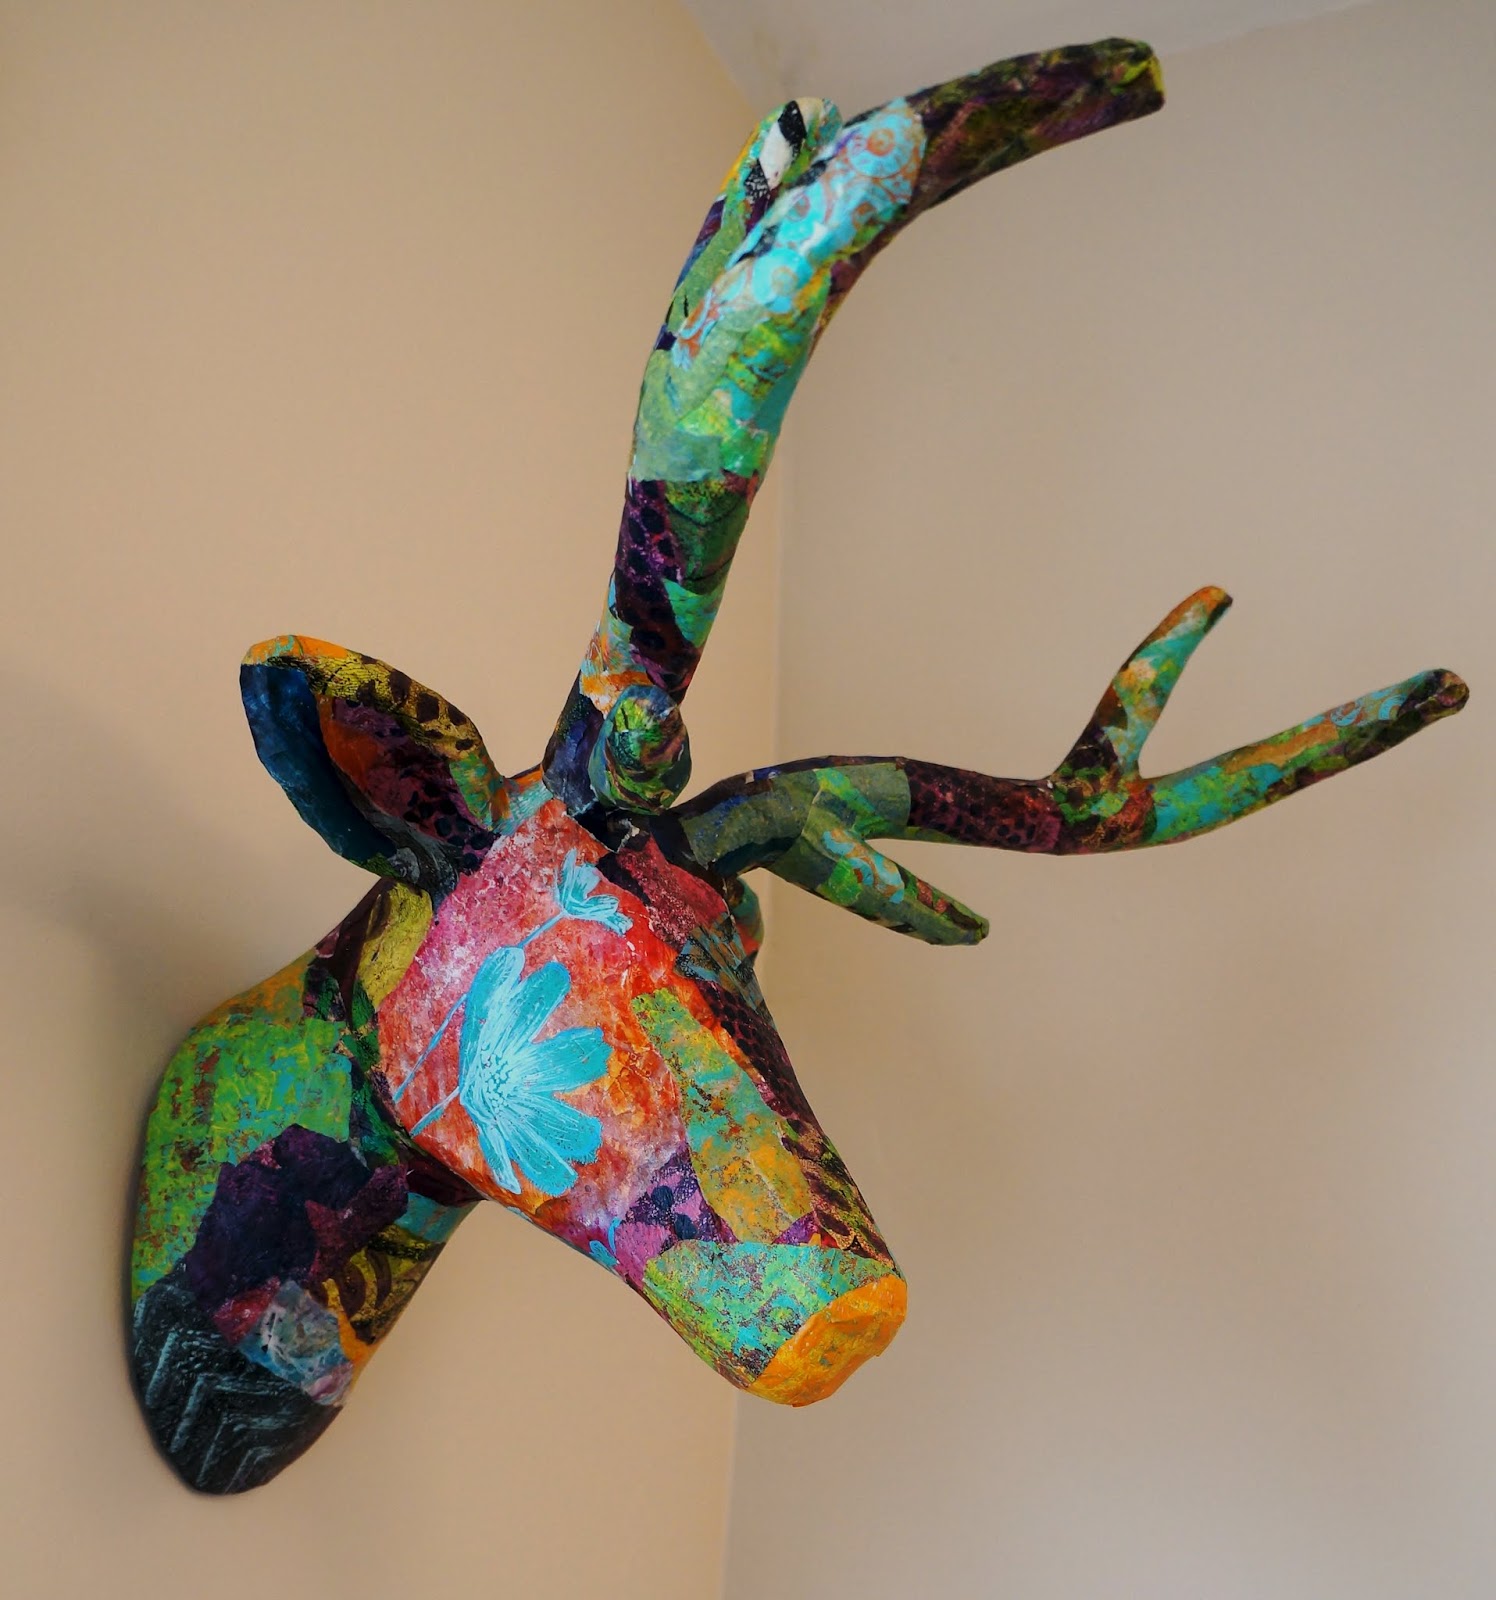
Here is Vera's demo example she created (so you can what I was going for with this technique).

I started some other pieces, but nothing else is finished.

I did love the textured background technique and have come up with modifications to try. I am definitely very motivated to work on these.

I never have liked working on canvas much. I did bring some canvases and canvas board to work on. By the end of the workshop, I  decided not to use these ever again. I hate the texture, it really drives me nuts. I am either going to work on paper, MDF panels, or cradled boards from now on. It's nice to make a final decision on this, as I been trying to make friends with canvas for years and it just never works for me.  I will mount works that are on paper onto canvas (that is on stretchers), as I like the way it looks instead of framing them under glass.

The workshop was definitely a great experience. I focused on art making for three days in a row, with no outside distractions, and no other responsibilities (no meal cooking, no household chores getting in the way). The biggest negative is that I slept horribly most nights, as the beds were hard and had rubber sheets on them, the bathroom door squeaked loudly, and the bathroom light shone into my room (around the edges of the door).  I will definitely take some additional items next year to help sleep better (egg crate mattress topper, eye mask, and sleeping pills).

They already have next year's instructors posted and I'm looking forward to returning!

Monday, September 12, 2016

Cow quilt

Earlier this year, I decided to make a cow quilt. Not a quilt with a cow on it, an art quilt shaped like a cow. 
Meet George. She is roughly 5'6" high and 6'6" wide.

George is raw edge pieced, with fused and stitched circles.

She is mainly recycled fabrics. Her rump is a curtain, you can see the metal grommets for the curtain rod. It was a patterned white-on-white fabric, but I painted the diamond shapes with acrylic paint. In order to get the paints to blend, without bleeding into the unpainted sections, I mixed my acrylic paint with clear aloe vera gel.  Below is a picture of what would happen if I had used water instead. The aloe vera worked very well. I did not add anything else to the acrylic paint as it is an art quilt and cannot be machine washed. I did iron the painted sections to help "set" the paint, with a teflon sheet between my iron and the fabric. It did "smoke" a bit and smelled a bit funny, so I turned down the heat a bit to medium high. I do not think this was toxic, but don't take my word on it. I should have put on my respirator.

This fabric (below) was a purchased solid white twill. I stamped the fabric using a washer. You can see the post about stamping this fabric here.

The top white section is a white cotton tablecloth. The colored belly section is a puddle painted piece of polyester sheer curtain.  My blogs on puddle painting can be seen here and here (not the same fabric, just the technique).

The fabric that looks like small dots (shown below in the middle and used for some of the legs) is a textured curtain. It was white and I lightly rubbed Shiva paintsticks over it, which only painted the raised parts on the fabric. After letting the fabric sit for a few days, I ironed it to set the colors.

I did have a full size paper "pattern" of the overall cow, but just used that to figure out my piecing.
 

Once all the pieces were sewn together, I pinned it to some batting and free motion stitched it, outline stitching the patterns on the fabrics.


I came into textile arts from a mixed media background. I will be the first to say that I will not pass any tests regarding having a beautiful back side on my quilt.  I did not want to have a binding around the outside edge, and did not want to have to turn down the curved edge of the fabric on the back side, so I used the "pillowcase method" which involves laying the backer fabric face to face with the quilt top, sewing all around but leaving an opening in one section, in order to turn it right-side out. Before turning it, I did add some iron-on stiff interfacing at her head and rump so she would not sag when she was hung.  I then turned the quilt right-side out and sewed 1/4" from the outside edge, all around the quilt. This is really too big a quilt to use the pillowcase method, and there are some wrinkles and folds in the backing fabric.  But she is a beauty on the front side!

Monday, May 2, 2016

Gelli printing, black and white


My friend Laura and I spent most of Saturday gelli printing. You don't have to twist my arm too hard to get me to gelli print.
Laura in action
 
I forgot to take pictures of any of her prints.
 
I had started a bunch of backgrounds previously to use with my new Denver skyline stencil.  I found the results pretty disappointing. The skyline looked a bit static and uninteresting. Often the print looked smudged, which doesn't work well for buildings. Also, the black wasn't a solid black, so the print just didn't look good to me.


Then I started playing with using textured papers and stencils to add pattern. I thought this was way more interesting and tried this with some other stencils as well.

And then I made a lot of prints.

I basically covered my plate with black paint and pressed textured papers and stencils into the paint (these stencils were not left on the plate, just used to add pattern into the black paint). Then, for the one shown below, I placed three circle stencils on the plate, and pulled a print. Then I removed the circle stencils and pulled a ghost print. 


The connected ovals are a custom handmade stencil. 


I had a great time with these. The last three were actually done on my 11" x 14" gelli plate so they are quite big. I think it is funny that whenever I have a specific idea for my gelli plate session, I often end up someplace else entirely.  I am thinking about adding color to these, but haven't made a decision yet.

Monday, April 18, 2016

Finnabair classes

The week before last, I took some classes with Finnabair at Imagine That in Columbus, NE. I was thrilled that an internationally known instructor came to Nebraska.  I was also thrilled that my sister decided to visit and attend some of the classes as well.
Myself, Finnabair, and my sister Cinda
My friend Karen, from Denver, also came to Nebraska for these classes. It was great to see her as we haven't had a chance to hang out for quite some time.


Finnabair demoing
My finished piece
My sister's finished piece

My piece from class two (it needs a bit of work still)

Cinda's piece from class two

There was an article in the local paper about Finnabair's visit and classes, here is a link.  I was in the background of the photo they included in the article. Art is very serious...
ImagineThat Guest


After class, my sister and I both worked on some other pieces in Imagine That's cropping room, and then some more at home.

Here is Cinda's piece.
 

And here is my piece.

I did not include any progress photos of these pieces, since the techniques are Finnabair's and teaching them is how she makes a living. I highly recommend taking a class from her, she really keeps everyone on track so you can finish the projects in class.


Monday, March 7, 2016

Fabric stamped with washers

I wanted to make some fabric with circle designs, but did not want to use stencils.

I decided to create my own stamps using washers and corks.   I glued the washer to the cork with E6000, so it would be easier to stamp with it. I made two different sizes.

Here is the smaller "stamp". I plan to make one of my hand sculptures out of this one.  I used my gelli plate as a palette to put my paint on and spread it out with a brayer. Then I stamped into the paint, then on the fabric.  I was using a Cotton Twill, and next time I will used a standard cotton, as the texture of the twill weave did affect the stamping.  I was going for a grungy imperfect look so I was happy with the results.  This one was with black and brown paints, although it is more black than brown.


This is the larger washer stamp. It is probably 2" in diameter.  I used red, yellow, a couple blues, and a brown paint to stamp these. This picture shows it laying across and hanging down from my dining table. It's a fairly large piece of fabric and was made for a specific project (still in it's early stages).

 And a close up. You can see the color variations and texture. It looks a bit rough up-close, but I like it that way. And from far away, it is uber-fantastic and exactly what I wanted.

Friday, January 22, 2016

Gelli print collaged deer head

I bought a paper mache deer head at Hobby Lobby in the spring. I have a farm/western themed bathroom and thought it would be fun.

I decided to collage gelli prints on it, because I have a ton of gelli prints. I gessoed it first, before collaging, since many of my prints are on translucent deli paper. I had no idea that collaging this would take so long. I got about halfway done back in May, then it got shoved in the closet for a while. I pulled it out a few weeks ago and got it finished. 


I love the flowers on his cheeks.

Wednesday, December 9, 2015

black and white gelli prints

Just because I started one project on Sunday, doesn't mean I won't work on a different one on Tuesday. I made a bunch of colored gelli prints for a project on Sunday, and yesterday I did a bunch of new prints that are black and white.

I got an instructional art DVD of Anne Bagby's, the link to it is here, and the first step is to make black and white patterned papers. Anne uses painted backgrounds, stamps, and stencils. I decided to use my gelli plate since it is so fast to make multiple prints. 

Black prints on white background.

White prints on a  black background.

Black prints on translucent deli paper.

White prints on translucent deli paper (I put them on a black piece of fabric so you can see the white paint on white translucent deli paper).

I cannot tell you how many unfinished projects I have, let's hope neither of these projects end up in the permanent UFO pile!