Showing posts with label Handmade Christmas gifts. Show all posts

Monday, October 13, 2014

Art Experiment: Felt dryer balls

Art Experiment is a a series of posts using supplies which I own but have rarely (or never) used. Failure or success is not important, it is trying something different and seeing what can come from it.  There are three goals: try something new, use something in my supply stash, and have fun/experiment in the studio.

 My aunt requested felt dryer balls for Christmas. A while ago (probably two years ago), I had bought an enormous bag of alpaca fiber. When I say enormous, I mean a giant garbage bag full of "seconds" (the second trimming, not as nice as the first cutting, but fine for felting). I washed all of it multiple times, but it still had tiny bits of grass and hay pieces embedded in it, so I didn't want to use it for a felt art piece. I thought this would be great project to use up some of this fiber.

I am not one to just provide boring ivory felt balls, they need to be colorful. So the first step was to dye some of the alpaca fiber.  My stash of Jacquard acid dyes was rather sad, just two yellows and a bright lime green.  Luckily, there is always KoolAid mix at the grocery store to offer me a larger color range. 

I used the acid dyes and some of the KoolAid by putting damp alpaca fibers in different ziplock sandwich bags, adding the dye (that I already mixed with water), and steaming it in a steamer on the stove for about an hour.

I also used some of the KoolAid (already mixed with water, at least two packages in a plastic party cup of water) and tried to make two-tone sections of fiber. This worked pretty well. I put damp alpaca fiber on cling wrap in the sink,  dipped one end of the fiber in one color and squeezed it a few times and took it out of the cup. Then I dipped the other end in a different color and squeezed as well.  This was super messy. I highly recommend wearing gloves or your hands will be dyed as well as the fibers.  After wrapping the bundle in the cling wrap, I put it in a microwavable container and microwaved it for two minutes. I would let it cool and if I thought there was still color that hadn't absorbed, I would microwave it again.  I think next time I would do this in a gallon ziplock bag instead of cling wrap, as the cling wrap did not really stay closed. I also dyed some solid colors in the microwave as well


Once the fibers had been dyed, I let them cool completely. After they were cool, I soaked and rinsed the fibers in room-temperature water.  I had forgotten to add vinegar to the acid dyes (vinegar is not needed for the KoolAid, it is already acidic) so I had to rinse those fibers quite a bit, as well as the red KoolAid dyed fibers (gloves recommended).  Once the water was clear, I squeezed as much water out as I could and laid them on a towel to dry.  There may still be a little dye in the fibers, so use a towel you don't like and put it on a protected surface or one that you can use a bleach cleaner on, in case the dye bleeds through.

Here are my fibers.
Close-up of the variegated fibers

I didn't dye all of my fiber stash, as I just plan to use the colored fibers to cover the exterior of the ball. I grabbed a hunk of the natural (ivory) fiber for the center of the ball and put it in a container of room temperature water. While it sat in there a few minutes, I pulled out the colored fibers I wanted to use on the exterior. I pulled and spread the fibers out, since they were kind of clumped from the dyeing process.  I squeezed out the excess water from the ivory fiber and shaped it into a ball, then laid the colored fibers over it - on all sides.  I then put it in hot soapy water while holding it in a ball shape, took it out and squeezed out the excess water, and then rubbed the ball onto some bubble wrap to start the felt process (for just a few minutes).

I put my ball in a pantyhose leg and secured it with a rubber band. I did this over and over until I had two pantyhose legs' full of these balls.  I had read on the internet that the balls work better for helping dry and de-wrinkle clothes if there were at least eight of them.  I have no idea if this is true are not, but making balls was fun for the first six or so, then I lost my initiative after that. So I pretty much quit rubbing the balls on the bubble wrap and just stuck them in the pantyhose after adding the colored fibers.  I do think the first ones felted quicker in the wash machine than the others, but not enough for me to think it would have been worth my time to hand-rub them. 

As you can see, I am not very good about making them a consistent size. You should see what happens when I make cookies, they are all different sizes too.
I then threw my pantyhose covered balls in the wash machine.  In our new house we have a fancy new wash machine. When I bought it, I saw this one had a Soak function so I figured I could still use it to felt.  I think they turned out well. I did run them through the washer and the dryer twice, hot water wash/hot dry. I will probably add them to my wash when I am doing a dark load a few times, just to make sure there isn't any residual dye before I give them to my aunt. I would hate for her clothes to have colored polka dots from the dryer balls!

Monday, December 2, 2013

Handmade Christmas pot holders

I've been having computer problems, but it's been so long since I've posted,  I decided to do what I could with our laptop. Unfortunately I don't have any photo editing software on it, so I had to use Picasa to crop and lighten photos. I do have a handful of posts to put up so will be blogging a lot this week.

Last year for Christmas, I started making hot pad holders for my Mom but they did not get finished. All they needed was binding, so once I finished them up, I decided to make some more.
 Front side, finished:
Back side shown on left:


I had made my Aunt some Christmas place mats and thought I'd pull out those fabrics and make some matching pot holders. See the place mat post here.

I already had some strips left over from the place mats, but had to cut some more. 
I sewed the strips together and ironed the seams. Then I cut on a 45 degree angle from the seams and cut 4 1/2" wide strips.  I then cut them into 4 1/2" squares.

 Here are all my squares. I played with the alignment and which square would go where.

Here is my final arrangement.  I decided the best finished size was 6 1/2" x 9". The first (purple) set was only 8" long and it left the wrist exposed, which I did not like. 6 1/2" wide let my fingers reach the side edges of the hot pad without them swimming around in the pocket. I cut two edges of my quilt top so the middle seam was still centered.
 So here are my layers: quilt top, heat resistant batting, cotton batting, back fabric and pocket (which is 16" long and folded/ironed in half, so the pocket piece is roughly 1" shorter than the rest of the pot holder).

Here are the finished pot holders. I could have done some free motion quilting on them but decided they may be more heat resistant without it.
 Back side shown on the left:
 I used this tutorial for doing the binding. There are things I liked and things I did not like about it, but it did the job. Hers looks way better than mine did. When sewing the front side, if I sewed it close to the edge of the binding, it did not catch the binding on the backside, I ended up sewing farther in from the edge than I would have liked. If anyone has a good all machine binding technique, please let me know. I did zig zag stitch all the layers together before adding the binding.

Then I made a pair for my sister. I think these are really fun. I just made a strip of different fabrics, each 2 1/2" high, width varies from 1" to 2 1/4" wide. I sewed a 3/4" strip to the top and bottom of the pieced panel, then added the larger pieces at either end. The purple ones at the top of this post were done the same way.

These were pretty quick to make and were well received at our Thanksmas (Christmas at Thanksgiving) celebration last week!

Tuesday, December 25, 2012

Double wine bag Christmas gift

Uncommon goods had these really cool wine bags that holds two bottles. Allen and I often go to the wine tasting on Friday late afternoon at B Town Liquor in Boulder and usually pick up a bottle or two. I thought this bag would be a nice gift for Allen.

I bought heavy weight canvas at the fabric store and made my bag from scratch. After buying the fabric, I saw someone else who made a copy cat bag, and they used a purchased canvas bag.  For some reason that hadn't crossed my mind and I already bought the fabric so I am still making mine. Here is the post for the other copy cat bag. Bag by infarrantly creative. Since I don't have a silhouette machine, I will be using freezer paper and stick-on letters as stencils, and using paint.

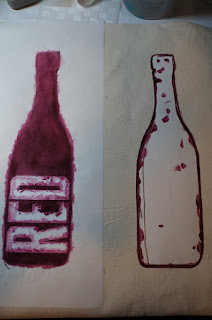
I traced a wine bottle on the back (non-shiny) side of freezer paper. I cut it out with an exacto knife as I am going to be using both parts.

I ironed on the freezer paper stencils (dull side up) to my fabric and I am painting prior to sewing the bag together. This is in case I mess up the painting part. I can always cut another piece of fabric if I make a big mistake.

I have 3" vinyl adhesive letters that I picked up at the thrift store for 50 cents. I applied the word "RED" to the open bottle. (By the way, if the freezer paper needs re-ironed on, do not iron the vinyl letters!)

I am using Setacolor transparent paint in Plum. I mixed it half and half with water.

Here I have painted the red bottle and outline painted the white bottle.

Once dry, I remove the letters and freezer paper. 

On the outlined bottle, I applied the word "WHITE" with the outer part of the letter stencils. I used some additional vinyl sticker material to create a small gap between the W and the E, and the bottle edges. When painting with stencils, it's best to put the brush on the stencil and pull the paint onto the fabric. It is less likely that paint will get under the stencil by doing this.


 Once dry, I remove the vinyl outline stickers.

I iron the fabric to set the paint.  I then sewed up my bag and it is ready to go.

Friday, December 7, 2012

Cute sewn camera strap cover

For Christmas, I made my sister a camera strap cover, using the instructions on LBG Studio.  I printed photos that my sister emailed me onto cotton fabric suitable for ink jet printing and included them.

I had made one for my Mom last Christmas that included photos of flowers she had taken.  When I saw her over Thanksgiving, I noticed the strap cover wasn't holding it's shape very well.  Re-reading the instructions, I realized I used regular iron-on fleece and not heavy duty. I was also almost done with the one for my sister so I just added a second layer of regular iron-on fleece to it and hope it holds up a little better.  If not, I know what I can re-make for them for a future Christmas.


Here is my rough layout with the printed photos and fabric pieces.  You can check out the LBG Studio website for full instructions. Please note that the pictures need to laid out so that they will be upright when the strap is being used.  


The few changes where I varied from the instructions.
1. Added photos.
2. Put a pocket at each end, instead of just one.
3. Put velcro on the pockets. I cut a piece of Velcro in half lengthwise. I sewed it to the exterior pocket side where the instructions said to sew two sets of stitches to hold down the folded over pocket edge.  I did three stitch lines. I attached the velcro to the strap piece prior to sewing the two strap sides together. The velcro had adhesive on the back so stayed in place while I stitched it down.
4. Instead of one piece of iron-on fleece on the inside of the strap, I put separate pieces on each strap side, 2.75" wide.  The first time I made one following the tutorial, the fleece over the first side seam would not lay flat and kept bunching up when folded wrong sides together.   The separate pieces worked much better for me.  As stated above, I used regular iron-on fleece instead of heavy duty by mistake, so I did put an additional piece on each side.  Perhaps the heavy duty iron-on fleece wouldn't have the bunching problem?
This is a great idea for personalized gifts, although I did have to get photos from my sister, so I told her what I was up to!

Thursday, November 22, 2012

Handmade pillows for Christmas gifts

I decided to make my Mom two pillows for Christmas, back in June, when I found this dogwood (or is it magnolia?) fabric at a sewing expo.  I knew she would love this fabric.

I looked in my stash for fabrics that would go well with this. I had a bunch of "linen-look" fabric in a yellow-beige that I had inherited from a friend.  I also pulled out some fat quarters for accent fabrics and bought some dark brown as well.

Here I am auditioning the arrangement of the fabrics for the mitered corner pillow. I went with the second one as I liked the contrast of the brown with the floral.


Here are my finished pillows.

 For the mitered corner pillow, I sewed the yellow-beige, polka dot, and brown fabrics into four matching strips. Then used I used this website to figure out how to miter these to the floral fabric. The fabrics aligned pretty well with this technique.


For the other pillow, I sewed strips of my accent fabrics to together. I used the bird template from a book I got at the library. I will amend this post when I am home and will add the book name. The book is Mixed and Stitched by Jen Osborn.

I ironed fusible web on the fabrics for the bird, traced the template on each fabric (traced on the paper protection on the backside fusible web, remember this will be reverse of the finished piece) and cut them out (cutting the brown one bigger than the polka dot one). I ironed the polka dot bird to the brown one, then ironed them both to the floral fabric. I free motion stitched around both bird shapes twice (with matching thread). I then sewed this piece to the accent strip.


I backed both of the pillow fronts with Warm and White cotton batting to make them a bit more durable and stitched in the ditch at all the seams.  I then added a zipper and the the pillow backs and was done. The birdie is super cute! We are having our family Christmas this week and I am sure my Mom will love these!

Tuesday, November 20, 2012

Christmas quilted placemats

In the last few days, I made patchwork placemats for a Christmas gift (to be given this week).

For these placemats, I made patchwork blocks on the diagonal, which were then sewn together.  My patchwork squares were roughly 6" x 6" for a finished placemat size of 12" x 18" (six squares). This design is similar to the patchwork trivets and table runner in Quilting Arts TV episode 711.

All my fabric strips below are sorted for each block. (Yes, there is some organization here even though it doesn't look like it!)

Here are the fabrics laid out for a block.

I sewed one block.

I put the sewn block on my cardboard template, and it is wayyyyy to small.  I added a solid red fabric and cut a strip of red for each block so they would all be big enough.

Here are most of my blocks sewn and ironed.

I tried different layouts for my blocks. The instructions (that I was semi-following) said to make diamond shapes but since I had 6 blocks per placemat I only had one and a half diamonds.

I thought about putting them in a Chevron type pattern.

Here are the final results. I cut two blocks in half (for each) and moved my diamond shape to the middle.


Lovely!

12/2/2013: See here for matching hot pad holders.

Monday, October 15, 2012

Thanksmas, Christmas at Thanksgiving

My sister likes to have Christmas at their house for the kids, but my Dad can't travel for health reasons. So we all go to my parent's house at Thanksgiving and celebrate our family Christmas then (dubbed Thanksmas).

I am not much of a pre-planner when it comes to Christmas shopping. I often wait until the week before Thanksmas to shop for gifts (we are talking mid-November, so I am not fighting the Christmas crowds). This year I have a lot of handmade gifts planned so I have to kick it in gear now.

As luck would have it, I have some gifts that I started for last Thanksmas that did not get finished in time, so they are already done or partially completed. I am only going to post projects for the kids and projects that the recipients know about, so I don't totally ruin the surprise.

We always seem to be short on stockings at Thanksmas so I thought last year I'd make some for my sister's kids. They were not done in time but I did finish them when I got back. I made these out of felted sweaters. As you can see I had to put a seam in the darker one as the sweater was not big enough, but I think it looks like part of the design. I did make sure to align the stripes when attaching them together. I hand embroidered their names at the top. I think they turned out great, but feel I should have made the stockings bigger and also used thicker thread for the embroidery.

I have new projects planned as well. I went to a rockin' 50% off yarn sale the other day. I bought yarn to make scarves for the kids (blend of Merino wool, cashmere, and acrylic). As I was knitting along on the first one, I realized that one skein was not enough yarn. So I decided to make it a neck scarf, the type that has the hole in it to pull the other end through. I've made good progress on the first one and may have enough yarn to get to the recommended 22" final length. I tried it out and I hope my 6 year old niece has a skinnier neck than I do!  I think it will be okay, and I will make sure to block it when I am done. This is a simple pattern, K a row, then K2, P2 (repeat) across the second row, and repeat these two rows. The hole is from 14" to 17". I used 26 stitches across, the original pattern was for 30.

I think I will be making my nephew a hat instead as it's a bit girlie.