Showing posts with label fabric dyeing. Show all posts

Monday, February 22, 2016

Snow dyed fabrics

We had a big snow storm a few weeks ago, so that meant a bit of snow dyeing was in order.

I did not iron these prior to photographing them.

This was folded in half and put on a PVC pole and scrunched, like for shibori. Then I laid the pipe flat on my rack, for snow, then sprinkled powdered Procion dye.

I used hotel key cards clamped to either side of a folded piece of fabric.

I used empty yogurt cups and rubberbanded the fabric on them. I was hoping the circles would be more distinct.

The rest were just scrunched and layered "parfait" style with snow and powdered dyes in big buckets.


There were quite a few more small ones. I bought a bunch of linen and cotton napkins at the thrift store a while ago, so threw a bunch of them in as well.

I am working on some new mixed media pieces and hope to have at least one finished so I can post pictures next week.

Thursday, September 3, 2015

Low-Immersion dyeing

Here I was thinking I was trying immersion dyeing for the first time, and while digging around on my blog, I see that I not only did immersion dyeing, but used the same ancient Createx dyes! That post is here . Too bad I didn't document how I did it the first time.

And the funny thing is, doing it the other day, I decided I really like low-immersion dyeing and it may be my go-to method for using Procion dyes. Less messy, I don't have to stir big tubs of fabric, and don't have to wait for ice or snow to melt.

For this low-immersion dyeing, I used my ancient Createx liquid dyes I had bought used, for pennies, a few years ago. I got sick of them taking up room in my dye box, so decided to use them up by doing low-immersion dyeing.  They are so old that I figured they wouldn't be very strong so I mixed roughly 1/3C of the liquid to make 1 cup of dye. I somehow had lot of brown dye, and did use some Procion Brown, Golden Yellow, and Antique gold with it in two of the containers.

For my dyeing method, I put one cup of dye in the bottom of the container, squashed one yard of damp fabric into it, then added a second cup of a different dye color on top. After 20 minutes, I poured in one cup of soda ash water (3 tsp soda ash dissolved in 1 cup of water).  The two containers (that had Procion colors mixed in) were rinsed out after two hours. One container had folded fabric and one had a scrunched fabric. The dyes did not get into the folds of the folded fabric and left a lot of white. Also, the brown seemed to be more of a maroon and had a red/pink cast to it. The scrunched fabric turned out great with lots of color variation. (Colors used: Createx Brown; Procion Brown, Antique Gold, Golden Yellow). The folded ones are getting re-dyed today.


 Detail

The other containers I let sit for 24 hours. I did this since the dyes were so old, and also in one of them I used black, and I had read it is best to wait 24 hours when using black.

I don't think these dyes were as stale as I thought. The fabric in the containers that sat for 24 hours ended up not having a lot of variation.

Createx brown and magenta
 Createx blue and black

Createx blue and purple


I really like these fabrics, enjoyed immersion dyeing, and am glad to have those Createx dyes out of my stash (they weren't getting any younger, and unlike wine, do not improve with age).


Monday, August 31, 2015

Over-dyeing with low-immersion dyeing

The other day, I did some immersion dyeing and did not like how these two folded pieces turned out. My brown dye ended up very pink (it was very old dye).
 Detail.
 I decided to over-dye them using low-immersion dyeing, but scrunched them, instead of folding them.  I put 1 cup of Procion Olive Green (2 tsp in one cup of water) added my scrunched damp fabric, then poured in 1 cup of Procion Golden Yellow (2 tsp in one cup of water).  I let it sit for 20 minutes, then added my soda ash water (3 tsp soda ash dissolved in one cup of water). I let it sit for 2 hours, then rinsed the fabric out.  I should have probably waited a bit longer, but still like the results and it is a huge improvement.  I would definitely cut these into smaller pieces, as I still don't like how strong the line pattern is from the first dye.


Thursday, August 27, 2015

Ice dyeing

I had a 20 lb bag of ice in the freezer and I had the itch to do some ice dyeing again.  I can tell autumn is coming and the time to do these outside activities is now. (I have done ice and snow dyeing inside in the winter, but find it is much easier doing it outside).

I wanted to make some blue sky type fabrics, and thought I would try some green/brown/gold fabrics as well, which are not colors I typically choose.

I did not take pictures of my process, but I use large tubs, and clip aluminum window screening to them. I soak my fabric in soda ash (I planned to soak them a half an hour, but they ended up soaking 4 hours). I wrung the fabric out, then squished/scrunched it and set it on top of the window screen covered tubs. I add ice, so all the fabric is covered. Then I sprinkle Procion dyes on until all the ice is covered (while wearing a mask to avoid breathing in the loose particles).  I have used liquid dyes before, but I like the results better with powdered dyes

Here are my results.

Oddly, I used Procion aqua marine, turquoise, teal, bright blue, and medium blue, yet my fabric looks more purple than blue. This is 100% cotton sheet.
Detail.
 

I also did some 60%cotton/40%linen, but the patterns where less distinct since it has a looser weave. Also, I got a lot of concentrated spots, which happens when there is not enough ice.

This is silk dupioni that was previously painted with Jaquard Textile paint, you can see the original fabric in this post. It was looking very pink after it dried, so I thought I would over-dye it blue, and it would look more purple.  This picture makes it look very blah, but in person it kind of looks like aged copper (with purples and blues).


In the second tub, I used Procion Bronze, Golden Yellow, Rust Orange, Antique Gold, Avocado, and Olive Green.  This is the first time I have used Olive Green and I absolutely love it. On my ice dyes, it became a gray green that I really like.
Cotton.
Cotton
Silk (I only soaked the silk in soda ash for 15 minutes. It is my understanding the soda ash can damage silk).

I had a couple other pieces, but they were similar. I am somewhat sad that my blue fabric looks more like purple, but I loved discovering I like Olive Green, which was unexpected!

Thursday, March 6, 2014

Updating the color on a whole cloth quilt

I had made this whole cloth quilt two or three years ago.  They are supposed to be "layered" houses but the color is too uniform.  I did not include any perspective (the houses in the back should be smaller) because I want it to look like a pattern as well.

I used Elmer's washable gel glue to create resist lines, and colored the houses different colors with thickened dyes.  The problem is, I did this on a previously snow dyed piece of fabric, so the color looked very uniform and the division lines didn't stand out.   I painted the roof lines, and window and door frames with Tsukineko white ink.  The whole thing still looks flat and blah. I thought adding different patterns and textures to the houses with the white ink would help, but it didn't really do much.

I pulled out my Setacolor transparent paints and have started adding more color to the houses.  I still have some more color to add.  I am thinking I'd paint all the doors and windows the same color, and use markers and pens to add more details to the trim and roof lines. It's definitely an improvement.

Monday, February 3, 2014

Snow dyeing fabric

We got 3" of snow last week, and it gave me the itch to snow dye some fabric. The next day we got another 3", so I had plenty of snow to work with!

I love the clearance fabric bin at Joann's.  I picked up some bleached muslin, Kona PFD, black Kona, cotton buckram, etc. from the clearance bin. I washed them, then soaked them in soda ash water. The black Kona, I tied up with rubber bands and put it in a color remover solution. It was then washed, then soaked in soda ash water.

Here are my dye "buckets". The two round pots have two layers of fabric in them, the one on the tray on the right only has one.  I do have strainers/pasta inserts in the pots to prevent the fabric from sitting in the melted snow water. The tray on the right is a broiler tray (for craft use only!) that has a drain pan.

I sprinkled my dye powders on directly, but liquid Procion dyes could be used as well. I typically let the snow melt completely before washing out my fabrics. I let these sit overnight.

 Cotton buckram:
 
 Buckram Detail:

Muslin:
Detail

Kona:

Bleached Muslin:

Black Kona, color partially removed, then snow dyed.

My Favorite! ROCL Renaissance

Detail:


I think the orange/blue Kona may need another round!

Tuesday, December 31, 2013

Dyeing a wool felt blanket

I have been reading the blog over at and then we set it on fire and in December they were talking about dyeing wool blankets. Of course, "dye" and "wool" grabbed my attention and I happened to find a cream wool blanket at the thrift store this week for $6. (In truth, I was pretty sure it was wool, but it had no tag so I did a burn test when I got home to make sure.)

I wanted to try to "confetti dye" some pieces, similar to Carol R Eaton's confetti dyed cotton fabric. Of course she was using Procion dyes on cotton, and I am using acid dyes on wool, but I didn't think it would be much different. Acid dyes are a bit more potent than the Procion dyes, so I expected fairly strong colors.

I cut a bunch of 16" x 16" pieces for some projects and also had some long strips. I soaked these in a mix of vinegar and water then wrung them out and put them in a bucket.

I plan on steaming the fabrics in plastic wrap bundles, and since I have nice new ivory counter tops in my kitchen, I set up a burner plate on a table in the backyard. (Yay for mid-50 degree weather in December!)  I needed to color and wrap my fabrics outside anyway, since I was using loose dye powder.

Here are my dyes, gloves, mask, mesh strainer, and plastic wrap.

Here is my burner, steam pot (for crafting use only) and a wool piece on two joined pieces of plastic wrap.

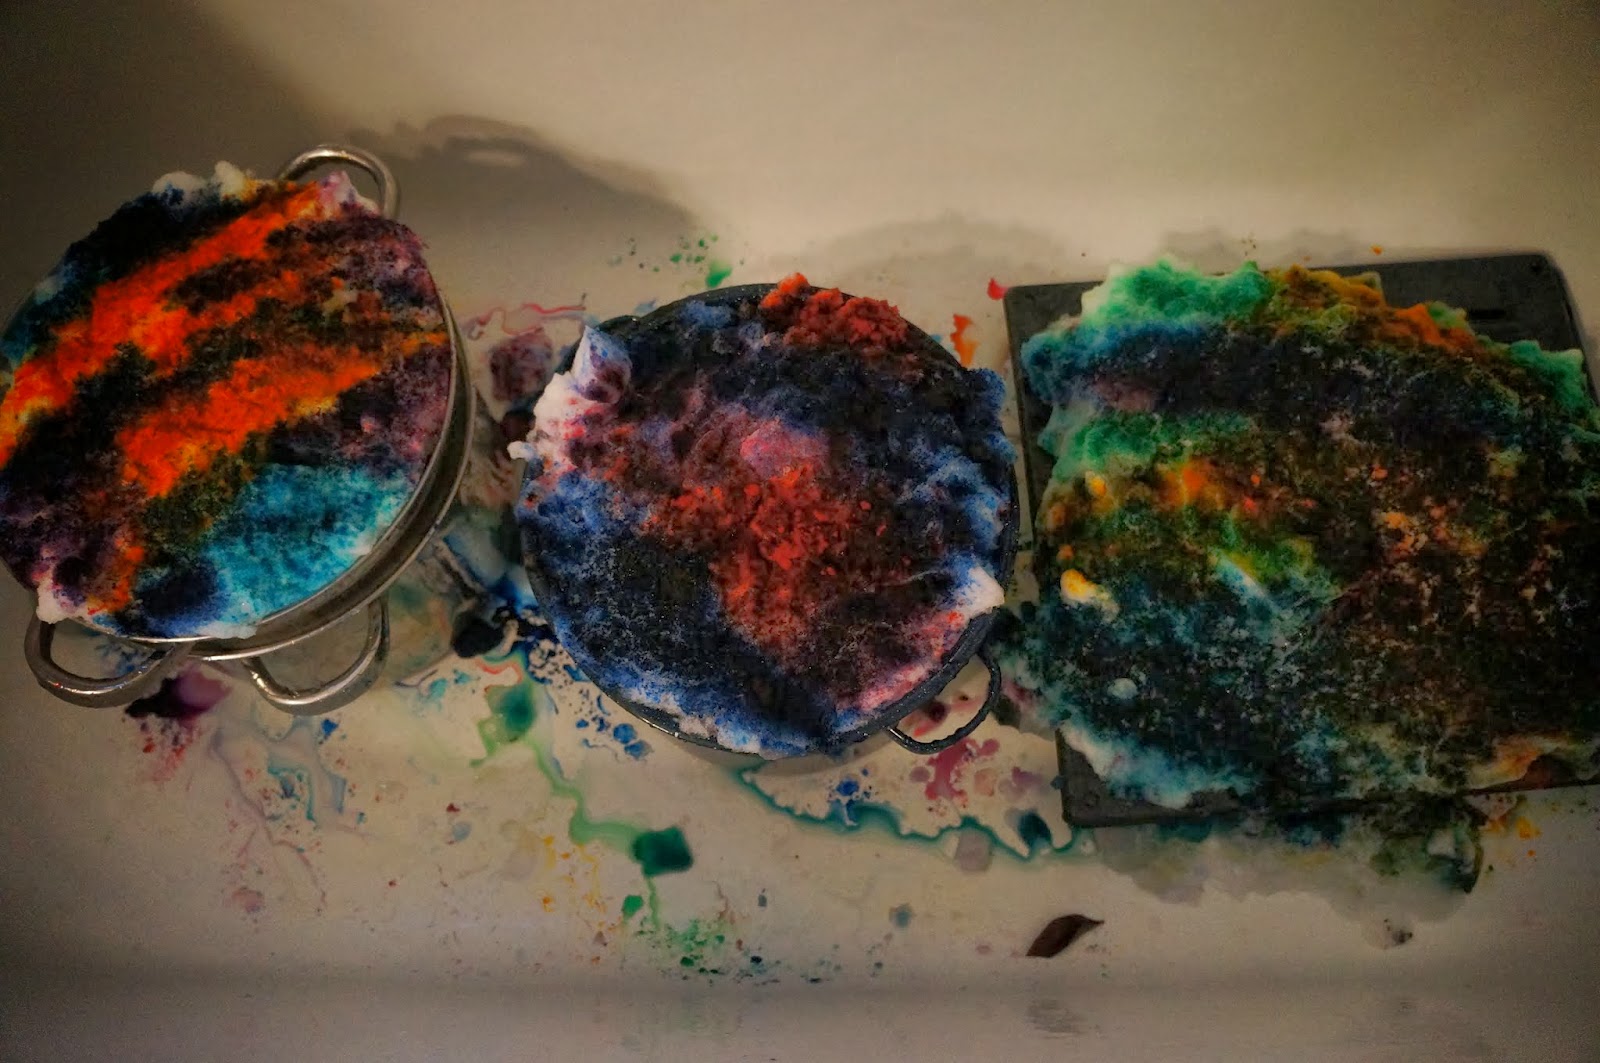
I sprinkled dye powders on the damp wool using the strainer. I found the strainer holes too big and got a lot of blotchy spots. Next time I might add a layer of cheesecloth (or similar) to slow down the dye sifting.

With dye sprinkles.


I put a piece of plastic wrap on top and then rolled it up in the plastic wrap that was underneath the wool. Here it is after steaming. It's pretty dark and I don't love the color combination.


On some of the confetti pieces, the backside was nice, but I find this one a bit boring.

I don't have any more "before" pictures of the other confetti sprinkled pieces. For this one, I did not put plastic wrap on top before rolling, I folded it in thirds, then rolled it, and then wrapped it in plastic wrap.
 

It looks pretty cool but I think it would be better if I used less dye.


 Back side:


This one looks like a 70's shag carpet to me. This one was folded in half, then rolled, then wrapped in plastic wrap.

 Back side:


I planned to steam all my packets at the same time and I was concerned that the confetti dyed pieces might be a disaster so I switched to liquid dyes. (1/2 tsp dye to 4 oz water and about 1 tbsp vinegar, which was probably not needed since the fabric was soaked in water/vinegar mix).

 Squirt, squirt.

Then I folded it and squeezed it to distribute the dye. I opened it to make sure there were no blank spots, then rolled it up with the plastic wrap trapped in the rolled fabric (like making stromboli). 

The results.

 
 This one was red and yellow squirts, which became orange during steaming. When I squeezed it, a bunch of extra dye came out and I mopped it up with the small rectangular piece below.


Leftover orangy-yellow dye from the piece above, plus some added Chartreuse.


These long strips were folded in half longways, then rolled or folded to become a small packet. Each side got squirted with a different color dye.


Here are all my wrapped fabrics ready for steaming. I steamed them about 45 minutes (with the lid on), and let the pot and fabrics cool for an hour afterwards.

I wasn't worried about them felting, so I rinsed them while they were still fairly warm. All of the liquid dye fabrics did not have any excess dye in them (their rinse water was clear). The confetti dyed fabrics had a lot of excess dye and I rinsed them in the sink for a bit.  I threw them all in the wash machine on delicate cycle with some Synthrapol detergent, then dried them in the dryer on low heat.
After steaming
After steam dyeing the packets, I made a pot of black dye and dyed a long narrow piece black.

I am looking forward to playing with these, but it will probably be a month before I have the time. (And I still have about 1/3 of the blanket left for some future project).