I had asked for Moy Mackay's book on Felt & Stitch for my birthday. It is even more lovely than it looked on the Amazon site. I have a ton of wool roving, although it is amazing how much white I have gone through since it is the base for all the pieces.
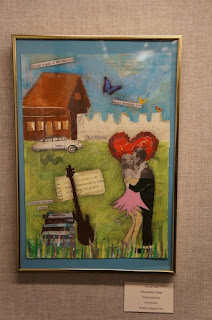
I forgot to take step by step photos. I put down two base layers of white roving, the second layer is perpendicular to the first. I then used colored roving to "make" my picture. I used blue roving and some blue silk hanky (the darker blue) for the sky. I added some green tencel or bamboo to the green roving for the grass. I don't know what kind of wool the black was, the fibers were really smooth, maybe it was merino? The reds are a hodge podge, I had bought some fiber packs that had curly wool, angelina etc mixed in it, as well as adding wool and more angelina from my stash. There are at least 6 different fibers in the red section. I did include some Nylon dyed fibers, but they were molting off the piece when I was felting it.
Here it is prior to felting.
Moy used a bamboo mat and garden screening for felting, but I used bubble wrap and fine tulle.I place tulle over the whole thing. I poked holes in the waterbottle lid and just used 1/4" of dish soap with 1/2 bottle of hot water.
Moy used a ribbed rolling pin, but I used this firm plastic roller someone gave me (for polymer clay?). After the rolling pin, the whole thing gets rolled up and rolled a lot, rotated 90 degrees and rolled, again, and again, and again.
Here it is after the whole felting process. I plan to do some machine and hand stitching, as shown in the book. It has a rippled texture on the whole piece that I don't quite like. Does anyone know how to prevent this or fix it? Maybe it was the bubble wrap. I will try to find a bamboo mat and see if that prevents it on the next one. I will try to take some better pictures next time the sun is out.
I also did some cherry blossoms. This one did not turn out as well, but I think with some machine and hand stitching I can give it a wow factor. I feel if I had used a blue sky it would have had more pop.
I cut cherry blossom shaped out of roving, but they lose there edges after felting.
The ripples are driving me crazy. I need to find a way to unripple it.
I plan on doing some smaller abstract pieces next week, if I can find space to do it as we are renovating the kitchen. Eeek!
Friday, January 25, 2013
Zip 37 Gallery Mixed Media show, last weekend and an article on the show
This is the last weekend of the Mixed Media show at Zip 37 gallery if you get the chance to go and see it.
Here is an article about the show, and Bobbi Walker's process for jurying the submissions.
Here is an article about the show, and Bobbi Walker's process for jurying the submissions.
Sunday, January 20, 2013
Colorado Mixed Media show at Bemis Library
I am in the Colorado Mixed Media group and we hung a show of our work today at Bemis Library in Littleton. We usually meet once a month to do an art technique and enjoy each other's company. It was nice to see everyone for a special event, especially since I couldn't make it to this month's meeting.
Here the installation of show.
My work.
Laurie and Rose with Laurie's piece.
Trish
Enid
Sue Shenk
Sue Clarke
Simone (Susan) Maxwell
Sabyl Horneck

This peacock was in the parking lot when we were leaving. It was so unexpected I thought I'd take it's picture too!
The show will be up until January 30th if you want to check it out!
Here the installation of show.
My work.
Laurie and Rose with Laurie's piece.
Trish
Enid
Sue Shenk
Sue Clarke
Simone (Susan) Maxwell
Sabyl Horneck

This peacock was in the parking lot when we were leaving. It was so unexpected I thought I'd take it's picture too!
The show will be up until January 30th if you want to check it out!
Zip 37 Gallery Mixed Media show, Best of Show!
We went over to Zip 37 Gallery to see the Mixed Media show and my piece "Revolution" got best of show! I am so thrilled and had no idea until we stopped by. Hopefully this is the first of many!
Saturday, January 19, 2013
Too many projects!
When I made my journal the other day, I had enough paper to make a second smaller journal. This one is about 4 1/4" x 7 1/2". The leather cover is really floppy so I may attach some cardstock or something on the inside to stiffen it up.
I wanted to lighten up the background canvas that is for my larger piece. Each time it dried, it still wasn't light enough. I think in the end I painted four additional coats. I was using watered down washes as I did not want to totally obliterate the first layer, and I didn't want a thick layer of paint. I also stitched on the lace pieces this week.
I started to pin down the circles, but the fabric was still a little damp. I plan to work on this piece next, until it's finished.
I did add some more paint/layers/marks to the smaller canvas pieces, but they still need a lot more work.
I got Beaney and Littlejohn's "In Stitches" DVD for my birthday. They do a lot of hand stitching/embroidery, but also do some other fiber work. So I started a stitched piece on dissolvable film with wool yarn. After hours of this, I realized what they showed on the DVD did not represent how long it actually takes to do this type of thing. I do like it and this project is great to work on while watching TV at night.
And another evening TV watching project. I plan to felt it when it is a reasonable size. I should have used larger needles and will switch to 13's when I knit the rest of the ball.
I will show a step by step on this one when it's done. My "visible man" that I used for this piece, had a heart shaped stand that I thought I'd use my torn rice paper with gesso technique on. I found a cigar box in my stash, which I gessoed. I decided while it was drying to put some spackle on the wood lid of the box (which I had taken off) for some future project. I was having such a good time spackling that I spackled the interior bottom of the box as well.
I went to the thrift store the other day and found this rusted metal plate that is attached to a wood frame. It is awesome and cost $4. I thought this would be great for a bell that I have been wanting to use, as it really needs a sturdy support in order to ring the bell. I pulled out an assortment of other stuff that I may use for this piece but it's still on the back burner since I plan to concentrate on assemblage in February.
The nice thing about working this way is I always have something to work on while another project is drying. The bad thing about working this way is I have quite an assortment of unfinished projects.
Tonight we are going to the Van Gogh exhibit at the Denver Art Museum. It's the last weekend and they are open late (or 24 hours?), and we could only get tickets for late evening, so will be going at 10:30 pm. Tomorrow we are going to out to brunch ( I love going out for breakfast), dropping off some art for an exhibit at the Bemis Library (which will be on display the 20th through the 30th), and stopping by Zip 37 Gallery to see the Mixed Media show that includes my "Revolution" piece. My husband made smoked pizza today so it's a great weekend! He made a one minute Youtube video on how to make a smoked pizza, here is the link.
Tuesday, January 15, 2013
journals and journal making
I enjoy making my own journals. Here are my last three journals. The one on the left, I used gel medium to cover a magazine page of the Sistine Chapel. I probably did at least three coats. I used a scrap of leather to cover the binding. The second one is all leather. I decorated it with brads (designed for scrapbooking). I wanted my last journal to be lighter, so I used hard covers but did a
coptic stitch binding and reduced how many signatures were in it.
Here is my coptic stitched journal. I disliked that the book form did not stay very rigid, so I will try something different this time. Also, the paper on the covers shows a lot of wear at the edges.
Here is a view of the inside of one of the earlier ones (2003). I did a lot more journaling back then.
I also include postcards and magazine pages that catch my eye.
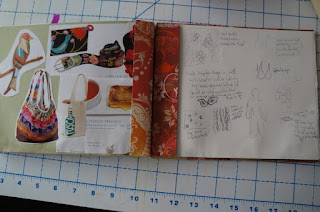
This is a view of my most recent journal. Lately I have been doing notes and sketches in ball point pen, and still attaching images of things that catch my eye. I have these short scrapbook pieces in it that I can attach a postcard or magazine page to. I did include some full page scrapbook paper pages in this book, but found them to be distracting. They were too busy to sketch or write on and I ended up just covering them with other images.
Another page from my current journal. This shows some ideas that I used for this piece.
I am going to use heavy copy paper and the short scrapbook pieces in the new one. I have included some watercolor paper in previous books but find I typically don't use wet media so isn't worth the cost and effort. I decided to try to go even lighter as well. I am going to use leather as my covers without any backer. I have some leather in my stash. I am basically making the new one the same size as the last one. In fact, all of these are roughly the same size, just some are vertical and some are horizontal.
When making books, paper needs to be folded in the "correct" direction. For example, with a sheet of standard 8 1/2" x 11" copy paper, there is less resistance folding it the long way, than folding it the short way. It should be folded in the direction of least resistance when book making.
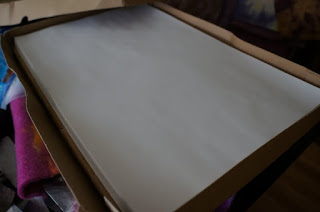
Years ago, I bought this ream of 11" x 17" heavy copy paper at Xpedx. I think I've used it for all my journals and still have quite a bit left. It can be folded the short way so it works great. I want my pages to be 6 1/2" High by 8 1/2" long. (8 1/2" times two for the length of the paper prior to folding is 17", so I only have to cut one edge of my paper, since the paper is 17" long).
I stack my paper (30 sheets) and put a metal ruler on the top of the stack. I use an industrial Xacto knife to cut thru the pages. It will take quite a few strokes of the knife, but I find this is exact enough for my needs. I then fold each page in half individually.
I want five pages of paper and two short scrapbook pieces for each signature. I plan to have six signatures in the book. (Oops, I am going to make another one later on that is horizontal and this shows the folded paper and the scrapbook pieces for the horizontal one.)
I put one short scrapbook page on the outside of each signature, and one between the third and fourth pages. I measure the thickness of my signature stack.
I then make a template using the thickness of my signature stack and figure out my hole placement for the leather exterior. I am using a two needle binding that requires four holes. (My template shows placement for five signatures, but there are actually six. I corrected this later).
I center this template on my leather and poke all the holes.
I created a second template using the same hole spacing and folded it into the signatures to poke their holes. I note "Top" on this template because my hole placement my be slightly off and if I keep all the signatures together with the tops aligned this will prevent hole alignment issues later.
Here is my purple plastic case with my binding needles and waxed thread. I like to use the curved needles for book binding.
I chose an orange thread for my binding. Here is my start of the two needle binding.
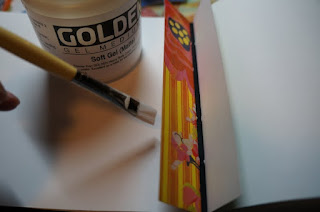
Since I didn't like how my last journal's signatures moved around a lot, I am pasting them together at the short scrapbook pages at the ends of each signature. I have never heard of this before, but read it on the internet last week and I figure it won't hurt.
I then clamped the edge so that the signatures would be fairly straight while it dried. I used some craft foam to prevent the clamps from indenting the leather.
I wanted to add these decorative "brads" to the cover. I have these in my stash but probably got them at a scrapbooking store.
I made a pattern on paper and cut the holes out. I want the holes to be slightly bigger than the hole on the brad.
I turned the template over and put it on the backside of the cover to transfer the hole pattern. I cut the holes with a very pointy Xacto knife.
The brads have tabs that fold to the backside, but I also used Goop glue to glue them to the cover. (Goop glue is very stinky and needs a well ventilated room). And here is my finished journal. I added a piece of scrapbook paper to the first page, so it would be seen through the holes. The elastic band I got at Target (2 for $2). I am going to put it under a weight to help flatten the leather, but I want the Goop glue to be totally dry first.
Eventually I will get around to doing the other journal with vertical pages. I found a lovely piece of sage/mint green leather in my stash so I will make a hardcover leather journal with it.
Subscribe to:
Comments (Atom)


