Friday, November 30, 2012

Small stockings from felted sweaters

A while back, I dyed and felted the arms from a cable knit sweater, here. Here is a picture of the felted pieces.

I pulled a couple different small stocking patterns off the Internet. This is the one I decided on, but I do not know what site it is from.  I cut the stockings out,  leaving some additional seam allowance. I got 2 stockings out of each sleeve. The sweater was gigantic, so even after felting, the sleeves were pretty big.  I also cut some out of a red felted sweater and also a pinkish felted patterned sweater.

This wool is thick! It would not fit in my sewing machine. I used embroidery floss and a mattress stitch to sew them. I went around twice with the mattress stitch. The part that folds over at the top needs to be stitched on the opposite side than the body of the stocking in order to hide the stitching.

 I like to use the felted seams for the hanging loops. Even felted, the sweaters have a lot of stretch. The seams do not, so are a lot more sturdy for the loops. For the cable knit ones, I had ripped them apart at the seams. I used the seam from the shoulder (seen at the top of the first picture on this post) for their loops.

Cute! I will be at the craft fair at Mark Twain Elementary school in Littleton tomorrow 10-2 and these will be with me.


Wednesday, November 28, 2012

A new fiber project, more wool dyeing, and a craft show

I am starting another multi-step fiber art piece. It involves wet felting which I don't do a lot of.  I am using thrifted wool sweaters instead of roving.  I will probably finish the felting in the wash machine as I have a feeling the sweaters will need a lot of agitation to felt. We will see how it goes.

First, I used my new "Embellish Knit" machine to make a lot of knit tubes for this piece (plus some extra). I just got the little machine for Thanksmas and it worked pretty well.  I typically did not put the weight clip (that comes with it) on it until the tube started coming out from the bottom, as the weight seemed to break the yarn if used at the start. I would just use my non-cranking hand to put tension on the yarn until the tube started showing, then use the weight. Also, I tried some thicker wool and also some two strand decorative yarn.They just became knotted messes so I don't recommend them for this machine.  I also cranked out quite a few "necklaces" for my nieces while I was visiting with them over Thanksgiving. I would let them crank the machine, once I had the tube coming out the bottom and the weight clip on.

Back to the project. Two of the sweaters I had bought were ivory and I decided to dye them. I used Jacquard acid dyes and/or Kool-Aid in a pot (used for crafts only) on the stove.  I cut off the sleeves of one of the sweaters, and 
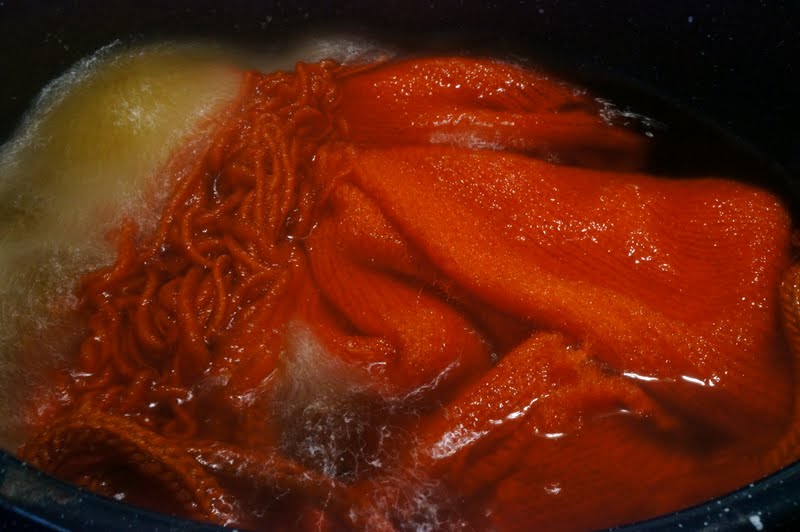
wanted to dye these yellow, so I used Jacquard Golden Yellow. I dyed two sweater arms, some of the knit tubes, and some yarn. They ended up being more Golden then Yellow. 


 So I cut off half the front of one sweater (it was a cardigan) and used lemonade Kool Aid to dye it ( I did include a pinch of the Jacquard Golden Yellow).  That is more like the yellow I had in mind.  Below, the sweater on the left was dyed with Jacquard acid dyes, mixing Sapphire Blue and Vermilion (1 tsp each) to make purple. This is much darker than I wanted. When will I ever learn that a little acid dye goes a long way?  The rest of the cardigan sweater is shown on the right. I started with two packs of purple Kool-aid, but there was so much water in the pot, when I tested it with a paper towel, it hardly had any color at all.  (I was out of blue Jacquard dye and purple Kool-Aid so I decided to improvise at this point). I added a Kool-aid Blue raspberry lemonade (which is light blue) and it had no affect. I added a red Kool-aid hoping it would make a purple with the blue, but it turned the water red. I already have two red sweaters for this project, so I decided to just make it completely different.  I added Jacquard Chartreuse Green to get brown. That's what I got. In the pot it looked rather an ugly brown too.  But when I took it out it was marvelously mottled. You can see it here on the right. I will try to take a better photo later on. They are still drying. Please note that Jacquard acid dyes require some vinegar, but Kool-Aid does not. If I mixed a Jacquard color with Kool-Aid, I added some vinegar as well.

I have to put this project on hold for a few days as I am going to be selling at a craft fair at Mark Twain Elementary in Littleton, CO on Saturday from 10-2. The address is 6901 S Franklin St if you can come. Today, I finished up my zippie coin purses that I started way back in August, see link here. I really need to work on finishing what I start, before starting other things. I finished about five of these way back when, and then got bored and moved to other things. I decided to finish them for the craft show, and really got in the zone. It still took me probably 6-8 hours over two days to sew them all.

I hope to finish a few more things for the show and plan to post them Friday.

Monday, November 26, 2012

Back from North Carolina

I visited with my parents and my sister's family in North Carolina for Thanksgiving and we had our family Christmas while we were all there.  We call it Thanksmas.  I won't go into family stuff since I consider this an art blog, but suffice it to say, it was a really good visit.

On the art front, I went to AC Moore while I was there (an art supply store, I always find something good) and they had a bunch of Decolorant on clearance.  They were marked $7.50, but rang up as $1.66 each. Sweet deal. I got this price on a big jar of regular decolorant, a 3 pack of red, yellow, and blue colors, and a bottle of spray decolorant.  I am planning to play with these later in the week.

We went down to the art district in Winston-Salem one day, as my mom wanted to go to the bead store (Bubbling Well Bead and Tea Bar) to get some help and supplies for a necklace she was making. It was a lovely bead shop and they were very helpful.  Their bead displays were beautiful. The link to their website is here.  Their chai was good as well!


 Here is my mom working on her necklace.

The art district has a lot of galleries, funky shops, and murals. I liked this one.

By the time we were leaving the  bead shop, the fiber art shop a few doors down had already closed for the day (at 3, I was sad).  We did go to the Piedmont Craftsmen store and they had a lot of variety of art and craft. I really like the work of the felt artist they had.  They had a sign that said, "no pictures" so I did not take any. I don't see a picture of her art on their website either. I wandered around in there for probably a half an hour. 

I got back from N.C. late Friday and Allen's brother's family have been visiting which has been nice. They live in California and we don't see them very often.  They will be headed back later today and I plan to get going on a lot of projects this week. I did paint some canvas fabric while I was in North Carolina, we will see if they become finished pieces.


Thursday, November 22, 2012

Handmade pillows for Christmas gifts

I decided to make my Mom two pillows for Christmas, back in June, when I found this dogwood (or is it magnolia?) fabric at a sewing expo.  I knew she would love this fabric.

I looked in my stash for fabrics that would go well with this. I had a bunch of "linen-look" fabric in a yellow-beige that I had inherited from a friend.  I also pulled out some fat quarters for accent fabrics and bought some dark brown as well.

Here I am auditioning the arrangement of the fabrics for the mitered corner pillow. I went with the second one as I liked the contrast of the brown with the floral.


Here are my finished pillows.

 For the mitered corner pillow, I sewed the yellow-beige, polka dot, and brown fabrics into four matching strips. Then used I used this website to figure out how to miter these to the floral fabric. The fabrics aligned pretty well with this technique.


For the other pillow, I sewed strips of my accent fabrics to together. I used the bird template from a book I got at the library. I will amend this post when I am home and will add the book name. The book is Mixed and Stitched by Jen Osborn.

I ironed fusible web on the fabrics for the bird, traced the template on each fabric (traced on the paper protection on the backside fusible web, remember this will be reverse of the finished piece) and cut them out (cutting the brown one bigger than the polka dot one). I ironed the polka dot bird to the brown one, then ironed them both to the floral fabric. I free motion stitched around both bird shapes twice (with matching thread). I then sewed this piece to the accent strip.


I backed both of the pillow fronts with Warm and White cotton batting to make them a bit more durable and stitched in the ditch at all the seams.  I then added a zipper and the the pillow backs and was done. The birdie is super cute! We are having our family Christmas this week and I am sure my Mom will love these!

Giving Thanks

Today I am with my family enjoying their company and a wonderful meal. Allen is with his family today, I will be flying back home tomorrow to spend time with them this weekend.

I hope everyone has a wonderful holiday and has a moment to reflect on the past year with warmth and happiness.

Tuesday, November 20, 2012

Christmas quilted placemats

In the last few days, I made patchwork placemats for a Christmas gift (to be given this week).

For these placemats, I made patchwork blocks on the diagonal, which were then sewn together.  My patchwork squares were roughly 6" x 6" for a finished placemat size of 12" x 18" (six squares). This design is similar to the patchwork trivets and table runner in Quilting Arts TV episode 711.

All my fabric strips below are sorted for each block. (Yes, there is some organization here even though it doesn't look like it!)

Here are the fabrics laid out for a block.

I sewed one block.

I put the sewn block on my cardboard template, and it is wayyyyy to small.  I added a solid red fabric and cut a strip of red for each block so they would all be big enough.

Here are most of my blocks sewn and ironed.

I tried different layouts for my blocks. The instructions (that I was semi-following) said to make diamond shapes but since I had 6 blocks per placemat I only had one and a half diamonds.

I thought about putting them in a Chevron type pattern.

Here are the final results. I cut two blocks in half (for each) and moved my diamond shape to the middle.


Lovely!

12/2/2013: See here for matching hot pad holders.

Wednesday, November 14, 2012

Some pics from our last art class at ASLD

 Here are a couple of Allen's pieces from our painting class at the art student's league in Denver.

I love this robin.
 

He is still working on this one.  


Here are two of my pieces. I have some others in progress as well. As I finish them, I will post them.

I really like this one from a distance but up close you can see previous paint layers that I tried to cover up. I do like the mix of textured fabrics and lace, and plan to experiment more with this.

Tuesday, November 13, 2012

Artsy handmade christmas cards

Last year I worked on making Christmas cards, but they never made it to the mailbox. I thought I'd show how they were made, as they look "arty" but are super easy and anyone with some decorative paper, some rubber stamps, and embossing powder can make them.

First, I made "serendipity paper". I don't know who came up this this term and technique. Basically, I took some papers that look good together (patterned, solid, holiday, metallic candy wrappers). I ripped them into various size pieces, at least 1" big, but many were bigger. Using a 12" x 12" piece of card stock as my base, I glued the pieces down, making sure they overlapped a little, in a very random way.  (Any glue will do, as long is it stays glued down, I think I used glue stick).  Once dry, I rubber stamped and used different embossing powders until I liked how it looked. I made sure to leave areas without any embossing.

Here are the papers (I didn't use all of it for the cards).

This is mainly red, I used gold, black and verdigris embossing powders.
 Here is a close-up.

This one is mainly green. I used black, gold, red, and glitter embossing powders.
 And a close-up.


Here are my some of my finished card fronts. I did embellish them with some gold 3D stickers to look like ornaments.


It's a fun "play" type project as there is not a lot of planning or thought. Just dive and have a good time!
They could be cut into round ornament shapes instead of trees as well.The serendipity paper is a great technique for collage or ATC backgrounds, it's a great jumping off point.


12/3/13 Here are some more pictures with star tree toppers and trunks added:


Sunday, November 11, 2012

Embroidered art, submitted for a call for entry

Here is my embroidered art piece, I turned it in this afternoon at the Core Gallery for their "Abstract" call for entry. 

I added some golden yellow yarn around the edge of the green fabric and framed the piece in a shadow box (I removed the glass permanently as it really blocked the depth and texture).

I hope it gets in, I should know mid-week.


Second Saturday club, Collagraphy


The Mixed Media art group met for our usual 2nd Saturday art group. We made collagraph plates but I had to leave before they got them printed.  For my post on making collagraph plates, see here.


We used mat board as a base as I thought the craft foam that I had used in my previous post got smushed to easily in the press.

Sabyl and Simone are hard at work.

Sabyl's plate. I really liked this idea, so I started a plate with string, but forgot to take a picture. I will add it when I finish the plate.


Simone hard at play.

Simone's plate. I brought embossing folders since I was using my die cutting/embossing machine as a press. You can see she ran the hair and dress through the machine using the embossing folders to get texture.

 Here is another of Simone's plates in progress.

Laurie used actual leaves on her plate. 

 It was a fun day and I was sad I had to leave early. I hope they bring their prints to the next meeting.