Today I am with my family enjoying their company and a wonderful meal. Allen is with his family today, I will be flying back home tomorrow to spend time with them this weekend.
I hope everyone has a wonderful holiday and has a moment to reflect on the past year with warmth and happiness.
Thursday, November 22, 2012

Tuesday, November 20, 2012
Christmas quilted placemats
In the last few days, I made patchwork placemats for a Christmas gift (to be given this week).
For these placemats, I made patchwork blocks on the diagonal, which were then sewn together. My patchwork squares were roughly 6" x 6" for a finished placemat size of 12" x 18" (six squares). This design is similar to the patchwork trivets and table runner in Quilting Arts TV episode 711.
All my fabric strips below are sorted for each block. (Yes, there is some organization here even though it doesn't look like it!)

Here are the fabrics laid out for a block.

I sewed one block.

I put the sewn block on my cardboard template, and it is wayyyyy to small. I added a solid red fabric and cut a strip of red for each block so they would all be big enough.

Here are most of my blocks sewn and ironed.

I tried different layouts for my blocks. The instructions (that I was semi-following) said to make diamond shapes but since I had 6 blocks per placemat I only had one and a half diamonds.

I thought about putting them in a Chevron type pattern.

Here are the final results. I cut two blocks in half (for each) and moved my diamond shape to the middle.

Lovely!
12/2/2013: See here for matching hot pad holders.
Wednesday, November 14, 2012
Some pics from our last art class at ASLD
Here are a couple of Allen's pieces from our painting class at the art student's league in Denver.
I love this robin.


He is still working on this one.

Here are two of my pieces. I have some others in progress as well. As I finish them, I will post them.

 I really like this one from a distance but up close you can see previous
paint layers that I tried to cover up. I do like the mix of textured
fabrics and lace, and plan to experiment more with this.
I love this robin.


He is still working on this one.

Here are two of my pieces. I have some others in progress as well. As I finish them, I will post them.


Tuesday, November 13, 2012
Artsy handmade christmas cards
Last year I worked on making Christmas cards, but they never made it to the mailbox. I thought I'd show how they were made, as they look "arty" but are super easy and anyone with some decorative paper, some rubber stamps, and embossing powder can make them.
First, I made "serendipity paper". I don't know who came up this this term and technique. Basically, I took some papers that look good together (patterned, solid, holiday, metallic candy wrappers). I ripped them into various size pieces, at least 1" big, but many were bigger. Using a 12" x 12" piece of card stock as my base, I glued the pieces down, making sure they overlapped a little, in a very random way. (Any glue will do, as long is it stays glued down, I think I used glue stick). Once dry, I rubber stamped and used different embossing powders until I liked how it looked. I made sure to leave areas without any embossing.
Here are the papers (I didn't use all of it for the cards).
This is mainly red, I used gold, black and verdigris embossing powders.
 Here is a close-up.

This one is mainly green. I used black, gold, red, and glitter embossing powders.
 And a close-up.

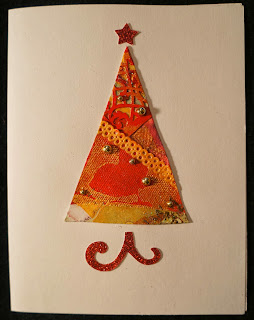
Here are my some of my finished card fronts. I did embellish them with some gold 3D stickers to look like ornaments.

 It's a fun "play" type project as there is not a lot of planning or thought. Just dive and have a good time!
They could be cut into round ornament shapes instead of trees as well.The serendipity paper is a great technique for collage or ATC backgrounds, it's a great jumping off point.
12/3/13 Here are some more pictures with star tree toppers and trunks added:



First, I made "serendipity paper". I don't know who came up this this term and technique. Basically, I took some papers that look good together (patterned, solid, holiday, metallic candy wrappers). I ripped them into various size pieces, at least 1" big, but many were bigger. Using a 12" x 12" piece of card stock as my base, I glued the pieces down, making sure they overlapped a little, in a very random way. (Any glue will do, as long is it stays glued down, I think I used glue stick). Once dry, I rubber stamped and used different embossing powders until I liked how it looked. I made sure to leave areas without any embossing.
Here are the papers (I didn't use all of it for the cards).
This is mainly red, I used gold, black and verdigris embossing powders.


This one is mainly green. I used black, gold, red, and glitter embossing powders.


Here are my some of my finished card fronts. I did embellish them with some gold 3D stickers to look like ornaments.


They could be cut into round ornament shapes instead of trees as well.The serendipity paper is a great technique for collage or ATC backgrounds, it's a great jumping off point.
12/3/13 Here are some more pictures with star tree toppers and trunks added:


Sunday, November 11, 2012
Embroidered art, submitted for a call for entry
Here is my embroidered art piece, I turned it in this afternoon at the Core Gallery for their "Abstract" call for entry.
I added some golden yellow yarn around the edge of the green fabric and framed the piece in a shadow box (I removed the glass permanently as it really blocked the depth and texture).
I hope it gets in, I should know mid-week.

I added some golden yellow yarn around the edge of the green fabric and framed the piece in a shadow box (I removed the glass permanently as it really blocked the depth and texture).
I hope it gets in, I should know mid-week.

Second Saturday club, Collagraphy
The Mixed Media art group met for our usual 2nd Saturday art group. We made collagraph plates but I had to leave before they got them printed. For my post on making collagraph plates, see here.
We used mat board as a base as I thought the craft foam that I had used in my previous post got smushed to easily in the press.
Sabyl and Simone are hard at work.

Sabyl's plate. I really liked this idea, so I started a plate with string, but forgot to take a picture. I will add it when I finish the plate.

Simone hard at play.

Simone's plate. I brought embossing folders since I was using my die cutting/embossing machine as a press. You can see she ran the hair and dress through the machine using the embossing folders to get texture.


Laurie used actual leaves on her plate.

It was a fun day and I was sad I had to leave early. I hope they bring their prints to the next meeting.
Thursday, November 8, 2012
Update on embroidered art
I thought I'd post a photo of the embroidered art piece in progress. I have two layers of fabric now framing the embroidered piece. I plan to add more stitching or yarn. I am still making decisions on that. I have until Sunday, so things are looking good.


Subscribe to:
Posts (Atom)