Tuesday, March 19, 2013

Mother Earth Assemblage

I had dyed a wool sweater, shown here, for an assemblage project. I wanted to make a pregnant woman out of the sweater, with a staircase in her womb.

I had found a set of staircase bookends last year at a second hand shop. I painted a box black and glued the staircase in (shown on left).  I cut the woman's figure out of 1/4" board with a friend's scroll saw. (Man, I want one of those!)

I traced the shape onto canvas, then I hand stitched the canvas to the sweater so I could put some polyfil in for her chest.


I cut a hole out of the sweater for the box to come out of.

I used Beacon's glue to attach the sweater hole to the box. I had left tabs around the sweater opening to attach to the box sides. 

I added a plumbers clamp ring (I have no idea what it is really called, but that sounds pretty good, right?). It comes round, so I took pliers to bend it to a rectangle. The side with the screw on it was left longer, in order to get the ring around the box. Then I used a screw driver to tighten the ring. It actually worked really well.
 
Looking good!


I stuffed polyfil in the appropriate places then used a staple gun to wrap the sweater around to the back side. I plan to cut the back piece of the sweater to cover the backside and hide all the staples. I will just use Beacon's glue to attach it.


I submitted this to a fiber art show and we will see if it gets in!

Monday, March 18, 2013

Sketching with water media

In the evenings I typically watch some TV, and I thought I would do something creative at the same time.  Since I've been doing a lot of assemblage and fiber art, I haven't done much drawing. I have missed it and really enjoyed messing around with some water soluble supplies the other night. 

I used Portfolio oil pastels and two Inktense pencils I bought to try them out. I love the color of the portfolio pastels, but they don't really keep their point so it is hard to do details with them. The inktense pencils just seemed like watercolor pencils to me. I had some colored water soluble graphite pencils but didn't end up using them.  I have a giant box full of these index card things (maybe 5" x 7"?) so I thought they would make good substrates.

I had this idea for circular flowers and I really like how cheerful they are.

I liked the circles so much I did an abstract one.

I did the red and blue lines in the background with the Inktense pencils, then didn't know what to do after that so I decided to draw a face. She doesn't look to bad considering I haven't drawn a face in a long while.

It was nice to doodle and play while watching my favorite shows and hope to keep it up. I want to do some felted landscapes, so I may draw some ideas for that tonight.

Altered altoid tins, 2nd Saturday club

This month, our 2nd Saturday Art Club got together on 3rd Sunday instead.  We altered tins (altoid and other tins). We had a great time as usual!

Here is Laurie and her round tin and the start of a house assemblage. Susan had wood house shapes to share, which I loved!


Here is the start of Sabyl's tin. 

Susan and her "lady". I love the metal faucet handle thing on top.


Here are Enid and Trisha working on their pieces.

Enid's faces.

Trisha's Van Gogh inspired sea scape.
 
Newcomer Liz is working on her tin. She had papered it, then had technical difficulties. I think she still enjoyed the camaraderie and craziness that is 2nd Saturday group!

Here is a piece I have in progress. I still need to glue everything down and I have a decorative piece for the top of the tin.

Here is the piece I made with Susan's house shape. The kid photos are me and my sister. The transparency in the tin is our childhood house in Toledo, OH. The bottom portion is a Diet Coke can that I ran through my die cutting machine with an embossing plate (Tim Holtz plate, I believe) and inked with Staz On.

It was a fun time, and we stayed for over five hours! A great way to spend a day!

Wednesday, March 13, 2013

Snow dyeing fabric to create circle designs

There are some blogs that I read on a weekly basis and when I was cruising blogs last week I saw this great idea on Carol R Eaton's blog. She is rubber banding items in her fabrics and then snow dyeing them.  I love the circle design she got with the wiffle balls. We had a bit of snow last week so I tried it out.

I had a bunch of styrofoam balls for another project. I also had some balls I made from aluminum foil (not perfectly round, but round enough). 


I did one large fabric with larger balls.

And a smaller piece of fabric with smaller balls.

Of course I throw on a couple other fabrics while I'm at it.

Here comes the snow!


With dyes added. I just sprinkled them on and was probably too heavy handed.

After the snow melted.

Close up.


 Here is the fabric that had the smaller balls.  I think it turned out great and plan to make it a field of flowers.

 Here is the one made with the larger balls. I think I should have wrapped the rubber bands a bit tighter around some of the balls as there are areas with no pattern.

 Close up.

This piece I just twisted and kind of rolled up (no balls).
This is a piece I just scrunched and laid across the whole screen, so it got warm and cool colors (no balls).

I love this portion and think it looks like trees. I can't decide whether to cut this section out or leave in the green and red area that is above to have it be more abstract. What do you think?

 I also dyed some cheesecloth as well.

I really enjoy snow dyeing as it is very easy. It was nice that I could do it outside as it was 60 degrees the day after the snow. I have some fiber projects to work on today and hope to have an interesting project done by Friday for posting.

Thursday, March 7, 2013

Wet-felted house and trees

 I took this picture the other day of a house in the neighborhood. I liked the way the trees framed the house. I also like the simplicity of it. I decided to do this picture in felt, and will put leaves on the trees since summer is on the way (never mind that we may get 12" of snow on Saturday).
I used white as my base. I then added a medium blue for the top sky and a light blue towards the bottom. I did use some hand carders to make a blend of the two colors for the transition. I basically used my white base layers for the house.

Here I have added the tree trunks and branches, the sidewalk, grass, and door.

For the leaves, I took many colors of green roving and cut them in tiny pieces over the trees to make the leaves.  Leaves are dark green wool, grass green wool, grass green bamboo, yellow green wool, bright green bamboo, light green bamboo, and light green wool.
 

Here it is after it is felted and I pinned it on a board to dry. I will post another picture when it is dry, as the colors should lighten up.  The house at this stage reminds me of a beehive, since the sides are curved.

This photo is after it had dried. I plan to add details, trims, windows, more leaves, etc., with needle felting.

Wet-felted poppies

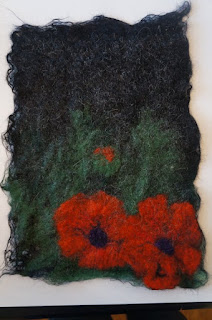
I decided to wet felt some poppies. We get giant poppies in our yard that are vibrant orange and almost as big as my head.

Here is before felting. I had dark green leaves in the background and additional grass green leaves on top of those. I originally only had the flowers but it looked too bottom heavy so I added the flower bud.
 I used white felt as my base, and that was a mistake as I now have a ton of white fuzzies on the entire surface. (This may be due to the type of white wool I used, which was quite coarse). I will add some needle felting to cover that up, as well as add some machine stitching to bring out the details and add more contrast.  I like the ragged edges on this one.

Tuesday, March 5, 2013

Adding needle felting to a wet felted piece

   
I had made this wet felted piece about a month ago, and I thought the black branches were to dominant. In order to help the piece, I decided to add some other  branches to the background. I printed a black and white copy of the image and played with where the branches would be.
Please note, that I did re-wet and re-roll this piece to help remove some of the ripples, and let it dry prior to needle felting.

Here I am auditioning some colors for the branches. A light green and a brown is on the left, a grass green and yellow-green is on the right. I went with the light green on the left.


Here is the piece with the added background branches. I think they may be a touch dark, but I plan to add more details to the flowers so I hope that will help bring the flowers into focus. I did needle felt some yellow-green bamboo fibers around some of the cherry blossoms. I also straightened some of the curves in the main branch and needle felted some more black towards the center of the branch where it was a bit thin.  I then backed this with an iron-on interfacing in order to do some machine and hand stitching.