Friday, December 14, 2012

Fiber art with wool roving and nylon

 After dyeing fibers for the last few days, I decided to play with them and make some art.  These are not finished, but I thought I'd show my progress.

I did not have an idea for the first three, I laid fibers down and attached them with my felting machine. I plan to add some free motion stitching to these.

Abstract
 

Sunrise. I am not done with putting fiber down yet, I think I'm going to add some trees in the foreground and of course fiber at the bottom as well

Diagonals. The purple is Bamboo and the shine is really nice on this fiber.

I really like this one. I used Nylon for the center of the circles and it has a lovely sheen.  I plan to add some hand embroidery.


Thursday, December 13, 2012

Dyeing Nylon fibers, with Kool Aid

I had bought an ounce of Nylon fiber at Fancy Tiger for $1.75/ounce. This picture doesn't do it justice as it is super sparkly.  Since Nylon is a man-made fiber, I decided to try to dye it with Kool Aid. It worked fabulously.
I mixed my Kool Aid packet with about a half cup of water in my plastic container designated for craft dyeing. I was worried about heating up the Nylon too much and it either melting or giving off gases (which would be extremely bad), so I added the fiber and only nuked it for a minute. It seemed to work great.  Here are my results. For the blue, I used the Iced Raspberry Kool Aid. For the dark one, I only used about a 1/2 cup of water. After removing the fiber, I added another cup and 1/2 of water and another piece of fiber and nuked it again.  I took that one out and added more water and another fiber and nuked it again. There is not much difference between the last two.  Red is Cherry. Orange is orange. The light one is a watered down orange, although it looks peachy-pink.Yellow is Lemonade. Obviously Kool Aid does not come in black. I decided to try Black Rit dye on one piece. It worked great and did not require a ton of rinsing to get the extra out, the way the Tencel did from yesterday's post. The only color that required two rinses was the red.

 I went to the grocery store and bought Grape Kool Aid as I wanted some purple fiber. Grape does not equal purple with Nylon. I got this weird maroon color, and a weird pink when I watered it down.  All the other colors were right on the money.

Shimmer and sparkle!


Wednesday, December 12, 2012

Dyeing Tencel fibers, with Rit dyes

I really liked how well the Bamboo fibers dyed in the last two posts, so I went back to Fancy Tiger to look for more shiny type fibers. I bought some Tencel and some Nylon.

I bought two ounces of Tencel, and it was $2.50/ounce. I only used about 1 1/4 ounce for this, so have some white left over.  
Tencel has a cellulose base, so can be dyed with Procion MX or Rit dye.  I used Rit since it was faster and easier. I have Azure Blue, Lemon yellow, Golden yellow, and Black. I mixed a very concentrated amount of dye with about a half cup of water. I added the fiber and put it in the microwave for one minute. The first one I did, I tried two minutes, but it made a weird popping sound and sprayed dye all over the inside of the microwave.  One minute seemed to be okay, but do it at your own risk. After microwaving, I took the fibers out, added more water to the same container of dye, put in another fiber section, and nuked it for one minute. That is how I got a light version and dark version of each color.  As you can see, there is not a lot of different between the lemon yellow and golden yellow. It took a lot of rinsing to get the extra dye out. I was doing the rinsing in the sink. I'd fill the sink with an inch of hot water, let them sit for a while, move them around in the water, then squeeze them out and put them on a paper towel. I did this multiple times, and even in the end, there were still some color stains on the paper towel. The black was the worst. I probably did ten rinses. Here they are after drying.
 And after I fluffed them up.
 Tomorrow, I'll show the Nylon, it is super sparkly!

Tuesday, December 11, 2012

More Bamboo fiber dyeing, using Rit dye

I really did want some of my fibers to be more muted than the results in the last post. So I took some more of my Bamboo fiber and used Rit dye to dye it.  I don't have a lot of Rit colors around the house. I have Golden Yellow, Lemon Yellow, and Royal Blue (and Black, which I did not use here).
I used the microwave method. I put a teaspoon or two of dye in about a cup of water, added the fiber, and nuked it in the microwave for two minutes. I mixed the Golden Yellow and the blue to get the green color.  I rinsed them in hot water a couple times in the sink. Here they are drying.
 And after I fluffed them up. I like the subtle colors.
More fiber dyeing tomorrow!

Sunday, December 9, 2012

Dyeing Bamboo fiber

I am planning on making some art with wool roving and my felting (embellishing) machine. I wanted some silk fibers to add some shimmer.

I went to Fancy Tiger in Denver as I know they carry wool roving. They had silk/wool blends but did not have 100% silk. I found some Bamboo fiber that had a lovely luster. It had been slightly dyed and had some blue-ish sections.  I decided to dye it six different colors, so I would have multiple colors to work with.

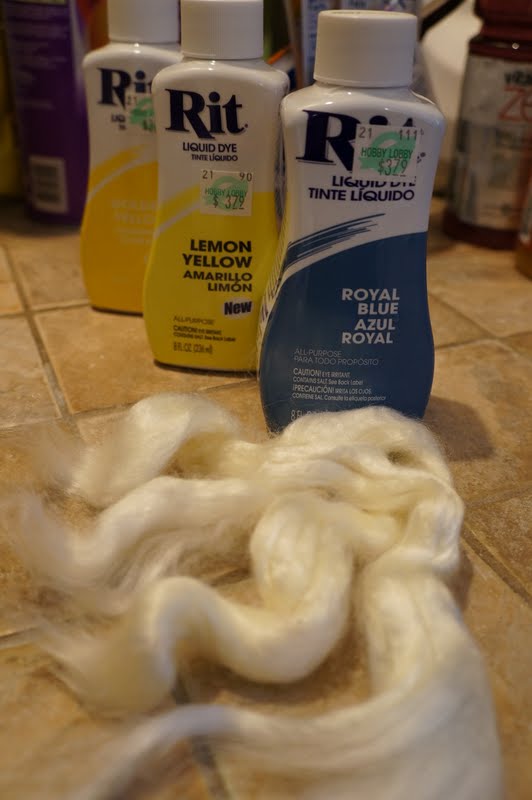
This is the bamboo fiber, as purchased. I bought two, but am only dyeing one of them.

I soaked my fibers in a soda ash solution for about an hour. I have a big bucket of soda ash water that I just keep using over and over, but I didn't want the fibers to get all tangled or lost in there, so I put them the solution and fibers in a gallon size zip lock bag. I knew I'd be using six colors, so pulled it apart into six sections before soaking it.

I mixed my Procion MX dyes with some salt in sandwich size zip lock bags (6 colors).  I used about a 1/4 teaspoon of dye in each. 

I put the fibers in the dye bags. This is when I think, what else can I throw in these dye bags? They are pretty small. I decided to dye some cotton lace/crochet.  I dunked it in soda ash water for about a minute, and left them pretty drenched with the solution when I took them out and put them in the dye bags (since I did not let them soak very long).  I left the bamboo fibers in the dye for 2 hours, and the cotton lace/crochet for four hours.

I used the same gallon zip lock  bag I used for my soda ash soak to rinse the dyes out of the fibers. I did not want them floating loose in the sink. I did pierce the bag in multiple places thinking the water from the sink could flow in and out of the bag, but it didn't really work that way. I let the lace/crochet pieces be loose in the sink. I did not wash anything in the wash machine. I washed everything in the sink, one cold wash, two hot washes, (all of these with Synthrapol) and then one hot wash with no soap.

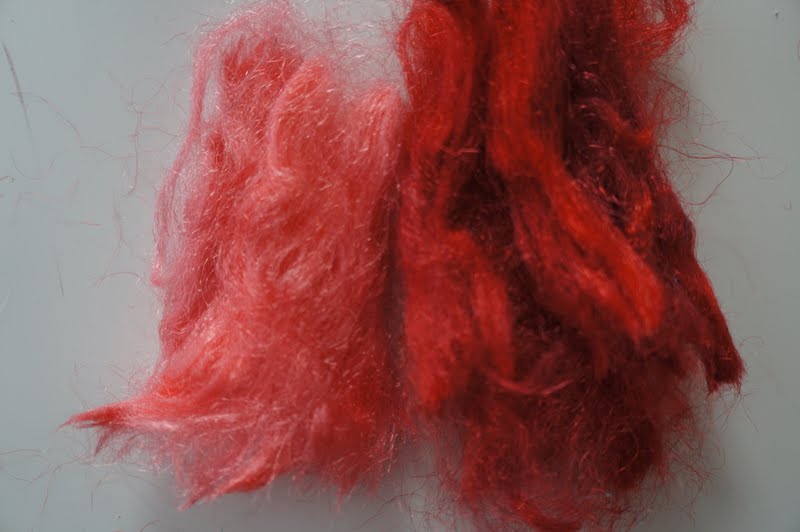
Here is the bamboo fiber after it dried.

I used my fingers to pull it out in tufts to reshape it.

Here are all my pretty fibers. They are darker than I really wanted, but still will be great in my felt art.


And here are the fibers with the cotton lace/crochet pieces. From the top, Jacquard color names unless noted otherwise: Carmine Red, Bright Green, Avocado, Lapis Blue (Dharma Trading), Deep Purple. The blue fiber above that did not have any matching lace/crochet is Azure Blue (Dharma Trading).

I plan to work on the felted art pieces later in the month. Currently I need to work on some mixed media pieces for a Call for Entry due December 19th.  I have them in the works already so will show progress photos in the next couple days.

Friday, December 7, 2012

Cute sewn camera strap cover

For Christmas, I made my sister a camera strap cover, using the instructions on LBG Studio.  I printed photos that my sister emailed me onto cotton fabric suitable for ink jet printing and included them.

I had made one for my Mom last Christmas that included photos of flowers she had taken.  When I saw her over Thanksgiving, I noticed the strap cover wasn't holding it's shape very well.  Re-reading the instructions, I realized I used regular iron-on fleece and not heavy duty. I was also almost done with the one for my sister so I just added a second layer of regular iron-on fleece to it and hope it holds up a little better.  If not, I know what I can re-make for them for a future Christmas.


Here is my rough layout with the printed photos and fabric pieces.  You can check out the LBG Studio website for full instructions. Please note that the pictures need to laid out so that they will be upright when the strap is being used.  


The few changes where I varied from the instructions.
1. Added photos.
2. Put a pocket at each end, instead of just one.
3. Put velcro on the pockets. I cut a piece of Velcro in half lengthwise. I sewed it to the exterior pocket side where the instructions said to sew two sets of stitches to hold down the folded over pocket edge.  I did three stitch lines. I attached the velcro to the strap piece prior to sewing the two strap sides together. The velcro had adhesive on the back so stayed in place while I stitched it down.
4. Instead of one piece of iron-on fleece on the inside of the strap, I put separate pieces on each strap side, 2.75" wide.  The first time I made one following the tutorial, the fleece over the first side seam would not lay flat and kept bunching up when folded wrong sides together.   The separate pieces worked much better for me.  As stated above, I used regular iron-on fleece instead of heavy duty by mistake, so I did put an additional piece on each side.  Perhaps the heavy duty iron-on fleece wouldn't have the bunching problem?
This is a great idea for personalized gifts, although I did have to get photos from my sister, so I told her what I was up to!

Results-glueing knitted wool to knitted wool

Well, this experiment was a bust. The wool stuck to the aluminum foil more than they stuck to each other.  I am thinking of trying it again, using the adhesives full strength instead of watered down (and on freezer paper or non-stick craft mat). I may still need to water down the Omni-gel as it is pretty thick and I don't think it will get through all the layers without being more viscose.


I am sure I can figure out a way to make this work somehow.  I may try wallpaper paste as well.