
Thursday, November 8, 2012
Update on embroidered art
I thought I'd post a photo of the embroidered art piece in progress. I have two layers of fabric now framing the embroidered piece. I plan to add more stitching or yarn. I am still making decisions on that. I have until Sunday, so things are looking good.

Tuesday, November 6, 2012
Wool roving on soap
For some of my Thanksmas/Christmas gifts, I decided to cover some soap with wool roving and felt it. This make the soap bar almost like a loofah and it will continue to felt with use as well.
I had never done this before, or any wet felting, but how hard could it be?
I learned that starting very gently pays off in the end (from my first four not so good attempts). I first wrapped my soap with white roving. It is best to do one layer and dampen it with hot water (dribbled on) and pat it to the soap. Another layer the opposite direction, another wetting/patting, then the third layer the same direction as the first, wet and pat. In the picture below, I started felting it before adding the colored roving, which was a bad idea. The colored layer didn't want to stick to the white layer because the white fibers were too far along in felting.

Once I got to bar number 5 (yes it took that long), I found I needed to rub tiny gentle small circles to the white roving (after all layers were applied) for a short amount of time, then add the colored roving in one direction only. I did more tiny gentle small circles until all the fibers seemed to be attaching, sprinkling with hot water every now and then. Then I took a piece of bubble wrap and started rubbing in earnest.
This is bar #2, I had felted the white roving too much before adding the colored roving, and the colored roving didn't want to "stick" and was very lumpy.

Here are my felted soaps. The turquoise on the top left and purple/blue at bottom left were bars 5 and 6, and are my best ones. I did not want to over-felt as they will felt more with use. I did go back to the other bars and rubbed them with hot water and bubble wrap and it did help somewhat with getting the colored roving to felt to the white. I still had to cut off some lumpy parts. My hands smelled like honeysuckle and orange peel for the rest of the day.

Pirate Day of the Dead show
The show at Pirate Gallery was super crowded and a good time! They had Aztec dancers inside the gallery for about an hour, followed by pinatas.
Here I am with my pieces.

Susan and Sabyl were there as well.

Susan and her piece, Jackie:

Aztec dancers:

Allen and one of the dancers (somewhat creepy, huh?):

Friday, November 2, 2012
Dia de los meurtos show at Pirate Gallery
Tonight is the gallery reception and Dia de los meurtos celebration at Pirate Gallery. If you are in the area stop by and see the art and events. I will be there around 7pm.
I have two pieces in the show. This is one of them.
Address and information on the events are on the Pirate Gallery website.

Address and information on the events are on the Pirate Gallery website.

Dyeing wool roving with Kool-aid
I was on Craigslist yesterday and came across a post for wool roving. Needless to say, I bought it. The woman had bought originally for someone to teach her kids how to spin yarn with it, and also color it. Here is the stash out of the bag.
 Here I separated the colored from the white, and found I inherited the kid's attempts at yarn as well. These will make great accents to a felted art piece.

I pretty much used the same method as I showed here to dye the roving with Kool-Aid.
I filled a plastic microwaveable plastic container about 1/3 to 1/2 of the way with water. I wanted the roving submerged, so only used as much roving as would fit under the water. I typically used two packs of Kool-Aid per color, though I did use three for the yellow.

I also wanted a brown so I tried this frosting flavor mix. I added vinegar to the water as I did not know if this mix was acidic. It worked but it took a lot of rinsing to get the extra color out.

Here is the Caramel shown, it is much darker than the picture on the package. Still it is a nice red brown. I also really like the blue shown here. I mixed three packets of Ice Blue Lemonade with a sprinkle of Grape.

And here are all the results.

Thursday, November 1, 2012
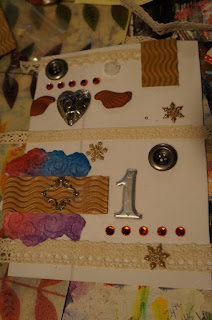
Making collagraph plates
For the Second Saturday art group, I am going to be showing how to make and print collagraph plates.
I used craft foam as my base, and embellished it with buttons, lace, corrugated cardboard, etc.
My messy studio table with lots of the embellishments shown.

My collagraph plate with everything glued down, I let the glue dry overnight.
Here I have painted the plate using Golden Open Acrylics.

I used my Wizard, which is meant for die cutting (a Cuttlebug should work too), and it worked great as a printing press. Here is the first pull. I had put a smaller piece of rubber mat underneath, and you can see the outline of it on this print.

I repainted it and ran it again with rubber mats covering the whole underside.

I made another plate that I will use to demo applying the paint at the Second Saturday meeting. (O darn, "Merry" is going to be backwards on the print!!! Those letters are double sided, maybe I can pull them off and re-glue?)

I do not think I will use craft foam as the base at our meeting. It makes the glue dry very slowly. Also, some of the embellishments pressed almost all the way through it, which could have damaged my rubber mats. So I need to change the way I put the layers together for the press or use a different base, I will probably do both.
I used craft foam as my base, and embellished it with buttons, lace, corrugated cardboard, etc.

My collagraph plate with everything glued down, I let the glue dry overnight.


I repainted it and ran it again with rubber mats covering the whole underside.

I made another plate that I will use to demo applying the paint at the Second Saturday meeting. (O darn, "Merry" is going to be backwards on the print!!! Those letters are double sided, maybe I can pull them off and re-glue?)

I do not think I will use craft foam as the base at our meeting. It makes the glue dry very slowly. Also, some of the embellishments pressed almost all the way through it, which could have damaged my rubber mats. So I need to change the way I put the layers together for the press or use a different base, I will probably do both.
Tuesday, October 30, 2012
Embroidered art project
I have been posting a lot about playing with supplies lately, so today I
thought I'd show a work in progress. I really like including texture
and depth with fiber, so the piece I am working on has both.
I started with a brown wool sweater that I tied balls (made from aluminum foil) into, and then felted it in the wash machine. I took the aluminum balls out and sewed in scraps of the brown sweater so they would keep their shape. I spray basted and pinned this to a piece of gold fabric and I have been hand embroidering around the balls.

I started with a dark green thread closer to the ball and and each row is progressively lighter.

I have one more row of embroidery to do, then I will cut off the extra brown sweater fabric, exposing the gold fabric. It will basically look like a big applique. There will be other fabrics on the sides as well before I am done. I am trying to finish this for a call for entry which is due November 9th.
Subscribe to:
Posts (Atom)