I did some marbling a few weeks ago, that post is here. I thought a lot of them could use a second layer. Also, I had problems with the paint adhering in the first session, so I wanted another layer in order to cover some of the sad parts.
The weather is much better this time, so I am working outside. Here is my set up. I have my carageenan mixture in the pan, and my diluted paints in little cups. I used a different pipette for each color.
Here I am putting paint drops in the carageenan mixture. I am pretty much using Jo Fitsell's technique for marbling.
Last time I had marbled one patchwork piece of dyed and painted fabrics, and I loved how it turned out. This time I am doing quite a few like this. Here is my piece about to be laid into the pan.
I gently pat the surface to make sure there aren't any air bubbles. I usually leave it resting in the pan until I can see the fabric is damp from the backside. I used a mix of quilting cottons and canvas, and the canvas was slow to absorb the liquid.
Here is the piece just pulled off the surface. As you can see, the colors of the original fabric make the paints look like different colors.
Wow, here are all my fabrics. I also did some wood pieces, and marbled on some paper collages.
Here are some of the results.
And why not try cheesecloth?
I matted about fourteen pieces to sell at an art show in June.
My favorites are the patchwork pieces. Again, the marbled paint is the same color throughout but looks different depending on the fabric color underneath. The orange section is orange fabric, and the green/purple sections are on blue fabric. I plan to mount the patchwork pieces on black painted canvas.
Showing posts with label Jo Fitsell. Show all posts
Monday, May 19, 2014
Monday, March 17, 2014
Marbling on fabric
Marbling on fabric, check out this beauty! My method to create this is below.
I prepped everything Friday to do some fabric marbling on Saturday morning. I am using Jo Fitsell's technique. She is a local Denver artist and I have taken a surface design class with her at the Denver Art Student's League. She was on two episodes of Quilting Arts TV, the link to one of the episodes is here. She has also done a full length video for Interweave on her marbling techniques.
I made my carrageenan liquid following the instructions on the package (I used Jacquard brand) on Friday late afternoon. The package said to make it 12 hours before and leave it at room temperature. Since it was longer than 12 hours, I put it in the refrigerator until 11 pm, then took it out. It needs to be at room temperature to use it. I didn't want to wait until the morning to take it out, then have to wait for it to reach room temperature. I also soaked my fabrics in an alum solution for about a half hour, then hung them out to dry. I did a solution of 1 3/4 Tbsp alum (all I had in the house) and a half gallon water. Next time I will use more alum. Alum is available in the spice aisle of the grocery store, but for larger quantities, it will need to be ordered online.
Here is my set-up. I am using Golden Fluid Acrylics. I mixed them roughly 50/50 with water (will probably add a little less water next time). The photo tray (roughly 14x16) has my carrageenan mixture in it. I have newsprint on the right to put the fabric on after marbling. I spread a drop cloth on the floor to put the fabric/newsprint on to dry. I would have done this outside if the weather had been nice, to give me more space for drying.
Here are some of the fabrics I used. There are some ice dyed fabrics, Setacolor puddle painted fabrics, white cotton, blue woven, hexagon commercial print, gelli printed fabrics, etc.
I forgot to take process photos, but basically I used droppers to drip different colors of paint in the pan, then laid the fabric down on top. I lifted it up and put it on newsprint, and then the drop cloth, to dry.
Here are photos of the fabrics after they were dry, before they were rinsed to remove the alum and carrageenan. Above each photo, I note what type of fabric was used.
Hexagon commercial print.
Poly sheer (left) and ice dyed cotton (right)
Dark blue woven (left) and black mottled (right)
Grungy green fabric from last marbling session (left) and ice dyed (right)
Gelli-print (left) and white fabric (right)
Ice dyed linen
Previous marbled fabric (left) and gelli print (right)
Gelli print (left) and dark blue woven (right)
Gelli print (left) and white fabric (right)
Silk organza (left) and gelli-print (right)
Ice dyed fabric (this was a pink/purple color)
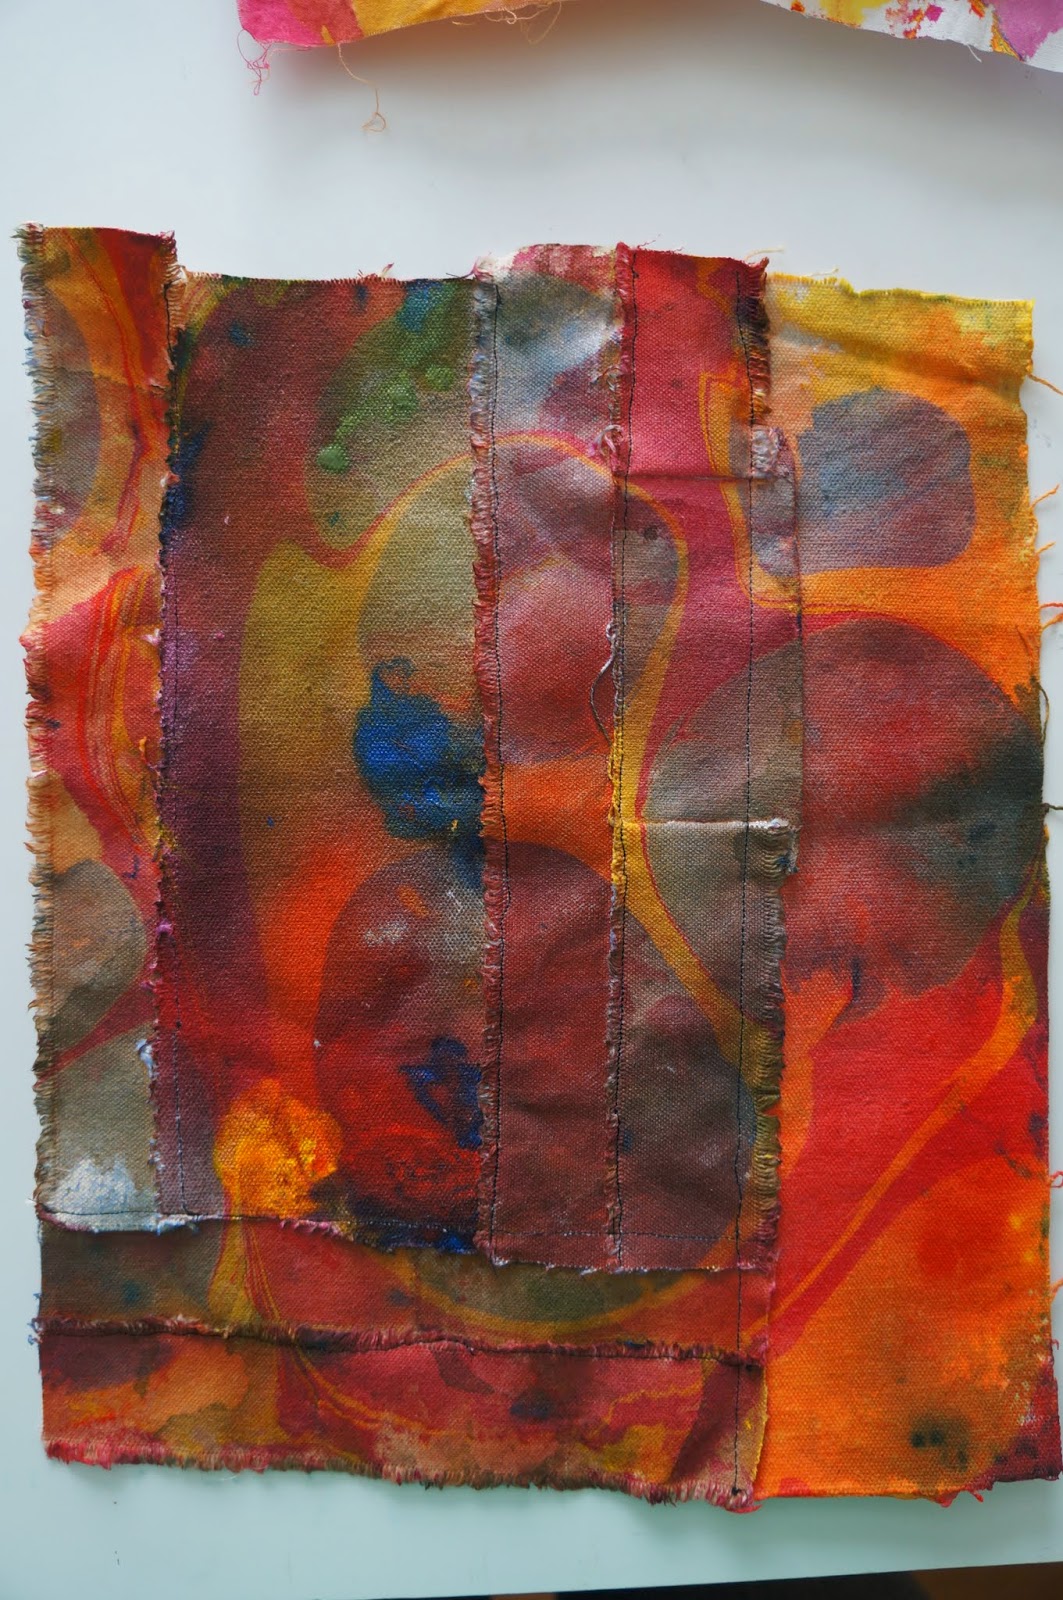
These were strips of acrylic painted canvas that I had sewn together. It was an orangy red with blue blotches. I did not think it would marble well, since it had different layers, but it turned out great! I am going to make some more "patchwork" type backgrounds to marble on.
I did have a problem with some of the paint getting removed (just a bit, but enough to notice and annoy me) from a handful of these during the washing process. Next time I am going to put more alum in my soaking water for the fabric at the beginning, to help with paint retention. I also will be a bit more gentle when washing them out. I did it in the kitchen sink, but put them all in and squished them around pretty hard. I would do them individually and just soak briefly in soapy water, then run under the tap. I am thinking of touching some of them up with watered down acrylic or I could do another layer of marbling.
After the prep work, the actual marbling of two dozen pieces took 2 to 3 hours. The carrageenan was down to maybe 1/4" deep (started at roughly 1-1/2" deep) and looked pretty gunky from all the paint so I didn't bother to save it. If I had more left (with less paint gunk), I would have put it in a container (for art use only) and put it in the refrigerator. It will last a little while in there (a week?).
After seeing the results, marbling can be pretty addictive. Now I need to make some art quilts with these!
Update: I did some more marbling in May which you can see here. I put a second layer on many of the pieces in this post.
Tuesday, October 30, 2012
Marbling on fabric
I found a marbling kit at the art store the other week and thought I
would give it a try. It said it was good on fabric or paper, so I am using fabric.
I am using the bottom of a broiling pan that is just used for art (I sometimes snow dye fabric on the broiler pan, since the water drips into the lower pan as it melts).
The kit comes with these paper circles that need to be pushed down to the bottom of the pan with a brush end, and when they float to the top, they are ready. I squirt the inks on the circles, this keeps the ink from sinking to the bottom of the pan. I used more than one circle to have more patterns. I squirted about 4 colors (sometimes repeating a color) on each dot. I found it needs to be a healthy size squirt to have the color show up well on the fabric. Sometimes I used the circle patterns as they appeared, sometimes I ran the end of a brush through it, and sometimes I blew across the pan to get the colors to move around.
After dripping the paints.
After a brush end is drawn through it.
I hold the fabric in a U shape, and set the middle down first, then let the ends fall slowly to the surface.
These examples are on silk organza that I had previously done transfers on years ago. The transfers on the left are Paris metro stations, the transfer on the right was the front of a card. I was afraid that the solvent used for the transfer would repel the ink, but they did fine. The one on the left was the first marbleized piece I did yesterday, and it was very light because I didn't use enough ink. The one on the right was later and had more ink.
Red and yellow ones. The red shows up as pink. The one on the right was without moving the paint around, the one on the left I moved the paint with a brush end.
Blue and yellow/primaries. I put a lot of green in the left one but it really didn't show up.
If you look closely at the fabric samples, the color lines are rather jagged. I used a piece of newsprint to clean the ink off the water surface, and the lines and colors are much better on it.
Please note I emptied and refilled the pan about three times to get roughly 15 pieces done. The water gets dirty and I had a hard time finding the paper dots after a couple pieces. I think I accidently washed one dot down the drain that I forgot to take out of the last pan (they are reusable, good thing it came with twelve of them). The package said to rinse the extra ink off the fabric when it is removed from the pan, so I did this project right next to the sink. I put the fabric on layers of newsprint on the floor for them to dry.
I have some fun fabrics, but I think this kit would be best for paper.
Last year or the year before, I did marbled fabric at the Art Students League with Jo Fitzell using carrageenan and Golden fluid acrylics and the results were way more spectacular. Carregeenan isn't cheap and has to be mixed up and then used within a few days. There is a lot more work involved, but the results were amazing. She was a DVD available through Interweave Press if you are interested in learning more about marbling with Carrageenan. Here is the link for it.
Subscribe to:
Posts (Atom)


